Grilled Vegetable Frittata with Veggie Sausage

I love breakfast.

It's my favorite meal. Wait, it's your favorite meal too? {I like you}

Eggs, cheese, toast, bagels, scones, jam, coffee. {WOW}

I once dated a guy who didn't like breakfast. His first meal of the day was lunch. {Weird, right?}

Of course I had to leave him. I had no choice. It was a deal breaker.

Brent (husband) really really really loves breakfast.

Thank Goodness, because breakfast was one of my criteria. You know, will I marry him or not criteria.


If you really want to impress your man - make him breakfast.

This is what I do. When I'm feeling extra fancy, I put on red lipstick and make a frittata.

I fry some veggies. Crack some eggs. Grate some cheese. Then I bake it up.

Phew, he loves it. Of course he loves it. Eggs, cheese, butter. What's not to love.

Don't be surprised if you get some flowers. You deserve it!


[Print Recipe]

Grilled Vegetable Frittata with Veggie Sausage Recipe (serves 4)

Ingredients

2 tbsp butter
1/2 sweet onion, sliced
1 veggie sausage (Tofurkey), sliced
1/2 red pepper, sliced
1 tomato, diced
8 eggs
5 to 7 squirts of Tabasco sauce
1 cup of shredded cheddar cheese
salt and pepper to taste

Directions

1. Preheat the oven to 425 F.

2. In a frying pan, fry the onions and veggie sausage in 1 tbsp of butter, on medium heat, until the onions are soft and shiny, and the sausage is light brown (10 minutes).

[note: you can substitute the veggie sausage for regular sausage, use a different veggie sausage, or leave it out. Up too you}

3. Add the red peppers and fry until soft.

4. Add the tomato and continue to fry for another 5 minutes.

5. Whisk (2 minutes) the eggs in a large bowl. Add the Tabasco sauce, salt, and pepper and stir it up.

6. Put the remaining butter in the frying pan. Once the butter has melted, and the eggs.

7. Top with the shredded cheese.

8. Put the frying pan in the oven and bake for 25 minutes or until golden brown.

9. Serve hot with homemade scones.

Cranberry Cream Scones


What's a better way to impress your house guests, than to make warm, fluffy, sweet scones for breakfast.

My house guests think I have some mad baking skills.

They think I spend hours mixing and kneading in the kitchen.

The kitchen exploding into a floury mess, might give them that impression. Flour on the floor. In my hair. On my face. On the dog.

Ya, my dog, he's a character. If he had opposable thumbs, he would be a baker. For sure.

When I'm baking, he never leaves my side. He sits on the ground staring intently at my every move.

True Story - I made banana bread. My dog stole the loaf from the counter. He ate the crust. The delicious sweet, brown, crispy, crust. In my opinion, the best part.

I don't know how he managed to eat the whole outer crust and leave the middle, but he did.

Now, I hide the baked goods.


One summer, during university, I decided to go to England. I wanted to connect to my roots.

My dad, he was born in England. He eats things like shepherd's pie, roast beef, Yorkshire pudding, and watches Coronation Street on TV.

When I was in England, I discovered things like curry chips, Ryvita, Ribina, Marmite, and scones. Scones, jam, and cream. With a pot of tea. YUM. So delicious.

I found this recipe. It's from Smitten Kitchen's blog. It's fun. It's easy.

I documented my baking process, step by step, just to show you how easy it really is.

20 minutes. That's all you need. Well, maybe some flour. And butter. And other good stuff.

These scones are the most perfect little fluffy pieces of heaven. I love how they rise and puff up while baking. I love that you can peel off the top layer perfectly. Like it was just meant to be.


[Print Recipe]

Cranberry Cream Scones Recipe {adapted from Smitten Kitchen}

Ingredients
2 cups of all-purpose flour
1 tbsp baking powder
3 tbsp sugar
5 tbsp chilled unsalted butter, cut into cubes
1/2 cup dried cranberries
1 cup half and half cream

Directions

1. Preheat oven to 425 F.

2. In a food processor, mix the flour, baking powder, and sugar.

3. Chop the cold butter into tiny cubes. Add the butter to the flour mixture and pulse, in the food processor, until the butter is in tiny pea size pieces.

4. Next, add the dried cranberries to the mixture and pulse a few more times until the cranberries are blended.

5. Transfer the mixture to a large bowl and stir in the cream until the dough starts to form a ball.

6. Place the dough onto a floured surface and knead until it sticks together (approximately 15 - 20 times).

6. With a rolling pin, roll the dough into a one inch diameter sheet. With a circle cookie cutter {a glass will work fine}, cut the dough into rounds and place on a cookie sheet. Bake for 12 - 15 minutes. Serve warm with butter and/or homemade strawberry jam.

Pear and Feta Spinach Salad


I like having visitors. It gives me and excuse to wear red lipstick and have Margaritas for lunch.

Me and my visitors, we've been eating. It's been good. I make sure all my guests get fat and sassy before they leave.

There's one problem. In Seattle, there's too much tasty food to get through in one week.

You likely need a month or so to try it all. By then, you will have probably eaten at all the best restaurants. Definitely tried all the best coffee. And hopefully sampled some mouth-watering cake, cupcakes, pie and chocolate.

Seeing as we only have a couple of days, cupcakes for breakfast are perfectly acceptable. Five meals a day is just fine. Chocolate covered cherries for dinner. Why not?


Do you ever crave salad? Crunchy, healthy, flavorful salad. I do. Especially when I've been eating out lots.

I usually plan my salads. I make a list. Then bring it to the grocery store and cross off items one by one. This time I didn't.

This time I scavenged through my fridge. It was like a foreign land. I've been eating out so much, I forgot what was in there.

Moldy yogurt, no thanks. Rotten carrots, I'll pass.


One pear. A bag of spinach. A tub of feta cheese. Score.

There were a lot of other cool looking things in there, but you've got to keep it simple. It's the key.

I opened up my cupboard and found some cashews. Yes please, I think I will.

I threw it all together. I finished it off with a little dressing from scratch.

Salad. I love it. So simple. So flavorful.


[Print Recipe]

PEAR AND FETA SPINACH SALAD RECIPE
(serves 4)

Ingredients
2 cups of spinach
1/2 pear, sliced
1/2 cup feta cheese
1/4 cup cashews
3 tbsp olive oil
2 tbsp lime juice
1 tsp Dijon mustard
1 tsp honey
5 squirts of Tabasco sauce
salt and pepper to taste

Directions

1. Wash and dry the spinach.

2. Cut the pear into slices.

3. Mix with a whisk or shake in a glass jar the olive oil, lime juice, Dijon mustard, honey, Tabasco sauce, and salt and pepper.

4. Lay the spinach leaves in a bowl or on a plate. Top with the sliced pear, cashews, then feta cheese. Drizzle with dressing just before serving.


Chewy Chocolate Chip Cookies with Dried Cherries and Coconut


My sister, her husband, and her new snugly baby, are all here in Seattle, to visit me.

Her new snugly baby (Jaxon) is so sweet.

He has the best life right now. sleep > eat > sleep > eat > sleep > eat > and sleep.

If he was old enough to eat solid foods, I would spoil him like crazy. I would make him all sorts of baked goods. Kids love baked goods. And puppies. And Play Dough. Being a kid is awesome.

I would will definitely bake him these chewy chocolate chip cookies. And then I will be the coolest aunt. Duh!

When he is old enough, I am planning to buy him lots and lots of really cool toys. I will take him to the park and we will fly a kite. This will be special. We will cherish this moment forever.


Chewy chocolate chip cookies with dried cherries and coconut. Hello taste buds. Who knew that it was possible to make chocolate chip cookies even better.

Chocolate chip cookies can pretty much be spiced it up any way you like. Get creative. But be realistic. Keep it simple. No one wants a not-so-good flavor explosion in their mouth. Think nuts, seeds, berries.

And love. A little love goes a long way.

These cookies are sweet, and chewy, and delicious. The sour cherry flavor compliments the dark chocolate so nicely. The subtle hint of coconut pulls it all together.

Cookies are awesome, because you can freeze the dough.

Then you can impress your house guests with cookies in 15 minutes. They will be amazed by your skills. Promise.


[Print Recipe]

Chewy Chocolate Chip Cookies with Dried Cherries and Coconut Recipe
{adapted from Smitten Kitchen}

Ingredients

2 cups of all-purpose flour
½ tsp baking soda
½ tsp salt
¾ cup unsalted butter, melted
½ cup packed brown sugar
1 cup white sugar
1 tbsp vanilla extract
1 egg
1 egg yolk
1 cup bittersweet chocolate chips
1 cup dried cherries
½ cup shredded coconut

Directions

1. Preheat the oven to 325 F.

2. In a medium sized bowl, sift together the flour, baking soda, and salt. Set to the side.

3. In a large bowl, cream the butter and sugars with a hand mixer until blended. Then, beat in the eggs and vanilla until creamy and smooth.

4. Mix the flour into the butter mixed until blended. Do not over mix. Stir in the chocolate chips, cherries, and dried coconut.

5. Bake on a greased or lined cookie sheet for 15 - 17 minutes. You want the edges of the cookies to be brown, and the cookies still soft to touch. Do not over bake or your cookies will turn out to hard.

6. Let cool on a wire rack for 10 minutes - if you can.

Strawberry Freezer Jam

I did it again.

I bought way too many strawberries.

They looked good. They smelled good. I wanted them.

When I got home, I was literally swimming in a sea of strawberries.

No person could eat this many strawberries, I thought. Not even me. So, I got crafty, and made jam.

It was extremely quick and easy. Not the way I remember jam making to be.

When I was young (lets say five), I used to visit my grandma during the summers. She used to make lots and lots of jam.

I have fond memories of her looking cute with a scarf in her hair, a frilly little apron, and yellow gloves all the way up her arms.

I would stare intently from the other room, watching the huge cauldron on top of the stove, boiling like an erupting volcano. It always scared me, that big boiling pot of water.

She (my grandma) would carefully drop each jar into the water, followed by the lid. She would then repeat this process over and over. At five, this seemed like forever. She also seemed really brave for going near that volcano.

This being my only memory of jam making, you can imagine how shocked I was, when my jam took only 20 minutes to make. I didn't even have to battle any erupting volcanos. Although, I am now much braver and probably could. Maybe.

You know - I bet a 5 year old could make this jam. I'm not suggesting that a 5 year old should make it. I'm just betting that they probably could.


All you need is strawberries.........


use those muscles (might be hard if your five).....


and mashed.

Finally, you will need to add some pectin.... and sugar. lots and lots of sugar. I mean 4 cups.

I think this is too much sugar for me (is that even possible?).

Next time, I will try making jam with no-sugar-needed-fruit-pectin (just for comparison's sake). This sounds good, right? Maybe?

[Print Recipe]

Strawberry Freezer Jam Recipe
{SURE.JELL Recipe}

Ingredients

2 cups of mashed strawberries
4 cups of sugar (wow)
3/4 cup of water
1 box of SURE.JELL fruit pectin

1. Wash, de-stem, and dry the strawberries. You want your strawberries to be ripe, but not overly ripe.

2. In a large bowl, mash the strawberries with a potato masher (1 cup at a time) or pulse in a food processor. You want small pieces left intact. Mix with sugar and let sit for 10 minutes. Wowzer, this is a lot of sugar. Adjusting the amount of sugar is not advised, because the pectin wont set.

3. In a small sauce pan, bring the water and pectin to a boil. Make sure you continuously stir the pectin. Once the water has boiled, continue boiling for one more minute and then remove from the heat.

4. Once the strawberries have sat for 10 minutes, stir in the pectin water.

5. Pour the mixture into small containers. Let them sit at room temperature for 24 hours, so the pectin can work its magic.

6. Store in the fridge for 3 weeks or in the freezer for one year.

Asiago Cheese Bread


I'm so happy that bread exists. Cupcakes. I'm also glad you exist. And chocolate. What would my life be without chocolate.

Let me tell you a little story about bread and yeast. It's a good one. Promise.

Two months ago I tried to grow (colonize?) some yeast, and had pretty good success. I really wanted to be hardcore and make my own sourdough bread.

Basically, yeast naturally occurs in whole wheat flour and in the air. If you combine warm water + whole wheat flour, and cover, hopefully you will catch some yeast. The yeast will then eat the flour and produce gas and bi-products. There are also bacteria. Good bacteria. The bacteria will eat the yeast's bi-products and produce acid.

The yeast makes the bread rise and the bacteria makes the bread sour. Together the yeast and the bacteria live together harmoniously.

So you leave the bread and water in a bowl on the counter and let it work its magic. This can take days. I know what you're thinking - ew, gross! What about mold, and fungus, and stomach cramps? Well, it's super hard for the 'unruly' bacteria to grow in this environment, because it's just so darn acidic.

Phew, that was a lot. Are you still with me?


So, two months ago I grew a sourdough starter. It was awesome. I was proud. The kind of proud a mother has when she shows you her new born baby. And then I say that her baby is cute, and I don't really mean it. Come one, not all babies are cute. Don't judge.

I took my starter and I made some sourdough bread. Go here to see my bread. If you want. No pressure.

It was a success. It was tasty. I was happy.

I put my starter in the fridge and now it's dead. Blunt and tragic.

Don't worry, there's a happy ending. It has cheese and cheese makes everything better. And chocolate. And cupcakes. And Gin.

Yesterday I tried to make a loaf using my dead yeast. It failed. I know, I know, move on.

I decided to add some commercial yeast to my starter. It was like a super yeast explosion party. My starter doubled in 5 hours. Magic.

I decided to persevere with the store bought bakers yeast concoction, and I added more flour, and water, and salt, and cheese. I let the whole thing party on its own, and I ended up with a savory, cheesy, delicious sweet loaf of bread.

It was awesome. The stars aligned, and pow! Cheese bread.


ASIAGO CHEESE BREAD RECIPE (makes 1 loaf)
{recipe adapted from The New York Times adapted from Jim Lahey, Sullivan Street Bakery}

Ingredients
3 1/2 cups of all purpose flour + more for dusting
1/4 tsp of dry yeast
1 tbsp salt
1 1/4 cups of water
1 cup of shredded asiago cheese

Directions

1. Combine 1/2 cup of all purpose flour, 1/4 cup of warm water, and 1/4 tsp of dry yeast in a small bowl or jar, cover with a damp towel and let rise for 12 hours or until doubled in size.

2. Once the mixture has doubled, mix with the rest of the flour (3 cups), 1 cup of water, and salt and combine with a wooden spoon. Pour the dough onto the counter and knead into a ball. Place the dough back into the bowl and let rise for 1 hour.

3. Punch down the dough and knead in the cheese. Continue to knead for 10 minutes on a floured surface. Place the dough into an oval baking baking dish. Cover with a damp cloth and let rise for 4 more hours.

4. Preheat the oven to 500 F. Add a pan 1/3 full of warm water to on the top shelf. Turn the oven down to 425 F and let heat for 10 minutes.

5. Place the baking dish on the bottom shelf. Spray the top of the dough with water and the wall of the oven. Bake for 40 minutes. Let cool on a wire rack.


Couscous with Grilled Eggplant and Zucchini


I found a new spot to take food photos. It is magnificent. It is grand. It is on the roof.

I went there today with my dog. He likes the roof. He pretty much likes going anywhere, as long as we are leaving the apartment. He even likes going to the garbage chute. He's weird.

My dog is a social creature. He loves everybody. Not like me. I am not a social creature. Well, sometimes I am, but mostly I'm not.

Over the years my dog has developed facial expression radar. He watches people as they pass on the street, waiting for any signal to pounce. Once he sees a glimpse of a smile, a look of excitement, a high pitched voice, it's over. There's no containing him. He's now your new best friend.

It's a very endearing quality he has. It's also, at times, extremely annoying. Especially when I'm hungry, and all I want to do is stuff my face, and all my dog want to do is share stories with a stranger.

Today I brought him (my dog) to the roof, and there was a man. He was suntanning. He looked peaceful. He looked relaxed. My dog thought that the man looked like he wanted to play. My dog was wrong. He sometimes is.

I went to the roof to take a picture of some couscous, with grilled vegetable, and tomatoes, and cheese. This dish was perfection.

The charred flavors from the grilled vegetables combined perfectly with the nuttiness of the couscous, the saltiness of the cheese, and the acidity from the tomatoes.

Couscous with Grilled Eggplant and Zucchini Recipe (serves 4)

Ingredients

2 cups of vegetable broth
1 1/3 cup of dry couscous
1 pint of cherry tomatoes
1 eggplant, sliced
2 zucchinis, sliced
1 cup of crumbled feta cheese
1/4 cup of olive oil
salt and pepper to taste

1. In a medium saucepan, bring 2 cups of broth to boil. Once the broth has boiled, remove from the heat and add the dry couscous. Stir and cover. Let sit for 5 minutes cover.

2. In the meantime, cut the eggplant into slices. Cover each slice, front and back, with a generous amount of salt. Place the eggplant slices in between 2 layers of paper towel, and place something heavy on top, like a saucepan. Let sit for 30 to 60 minutes. This process will remove the bitterness from the eggplant.

3. Then, wash the salt off of the eggplant and cover top and bottom with olive oil. Cover the zucchini with olive oil as well.

4. Grill the eggplant and zucchini for 5 minutes on each side. Once grilled, cut into small pieces and combine with the couscous.

5. Cut the cherry tomatoes in half and add to the couscous, along with the crumbled feta cheese. Drizzle with the remaining olive oil and season with salt and pepper. Serve with a dollop of sour cream.

Vanilla Cupcakes with Chocolate Frosting


I just got back from an awesome vacation. It was long. Three weeks long to be exact. On this vacation I got fat and sassy. I guess there was too much drinking, eating, and lying about. Is that even possible?

This week I said enough to the fat and sass. I started exercising. Exercising like a maniac. This is what I do. I am a maniac.

I must have stretched, pulled, strained, and/or broke my left side, because I've now got this muscle pain thing. It's in my hip. It's in my side. It runs from my hip through my side. I'm not sure what's going on. I feel old. Not like 32 old. Like 89 old.

I now have a limp. It's hot. It's cool. I know.


I love to bake. I love magic. I like things sweet, and cakey, and chocolatey.

I made these cupcakes. They are amazing. I love them. I mean really really love them. I made twelve. Twelve delicious cupcakes. Twelve delicious cupcakes sitting on a pretty pedestal, sitting on my counter, staring at me in the face - every day. I still have five. Five cupcakes left. This is surely a sign that I need more friends. Cupcakes should not last this long. This is just wrong.


Someone better get over here and help me eat the rest of these cupcakes. Or else. Or else I will throw them out. And that's not cool. Not cool at all.

My husband likes cupcakes, but to be honest, he's more of a savory guy. I know, it's weird right?

He's also got great self-control. This is a term that I am unfamiliar with (self-control).

Yesterday, I ate two cupcakes and he ate only one.

This cupcake over indulgence might be related to my ultimate ninja training. Ninja training burns a whole lot of calories you know. I'm now able to eat more than him (my husband). It's awesome, right?


I shouldn't have to say this again, but I will. These cupcakes are totally spectacular.

I put a raspberry on each cupcake for a little flare. They didn't need it. I know. They were fine on their own. Perfectly acceptable. But you know, raspberries just make things better. Kind of like puppies. Ya, that's right. Puppies make everything better.


Wowzers, chocolate, I know. So good, right? You bet I dipped my finger right in that bowl of chocolate. Oh yes I did. And it tasted amazing.

VANILLA CUPCAKES WITH CHOCOLATE FROSTING RECIPE 
makes 24 cupcakes
adapted from More From Magnolia
notes: self-rising flour is simply all-purpose flour, baking powder, and salt. For every one cup of flour, use 1 1/2 tsp baking powder, and 1/4 tsp salt. 

CAKE INGREDIENTS
1 1/2 cups self-rising flour
1 1/4 cups of all-purpose flour
1 cup (2 sticks) unsalted butter, room temperature
1 1/2 cups sugar
4 large eggs, room temperature
1 cup milk
1 tbsp vanilla extract

ICING INGREDIENTS
1 cup (2 sticks) unsalted, softened butter
1 1/2 cups of bitter sweet chocolate chips
1 tsp vanilla extract
2 1/2 cups of confectioners sugar

Preheat the oven to 350ºF.

Line a muffin tin with cups. Set to the side.

Mix the two flours together with a wire whisk and set to the side.

In a large bowl with a hand mixer or in the stand mixer using the paddle attachment, beat the butter and sugar until smooth light and fluffy - 3 minutes.

Add the eggs one at a time, and beat until combined.

In a small bowl and the vanilla to the milk. Add the milk and flour to the butter in 3 equal parts, alternating between the two. Beat until all the ingredients are combined. Do not over mix.

Fill the muffin cups 3/4 full. Bake for 22 minutes or until a toothpick inserted comes out clean. Once done, remove from the oven and let cool in the pan for 5 minutes. Transfer to a wire rack to finish cooling.

To make the frosting, use a double boiler, or fill a medium saucepan 1/2 full with water. Place it on the stove and heat the water on low. Place a small bowl or smaller saucepan into the saucepan ensuring that it is touching the water. Pour the chocolate chips into the bowl and continue to stir until melted. Once melted, remove from the stove and water and let cool to room temperature.

Once the chocolate has cooled, place the butter into a bowl and beat with a hand mixture until light and fluffy. Add the chocolate to the butter and beat until combed.

Add the vanilla and then the powdered sugar. Beat until fluffy. Do not over mix.

With a spatula, scoop the icing into a piping bag. Pipe the icing onto the cupcakes.


How to Grill your Vegetables

I was feeling uninspired. I was lacking creativity. I was feeling blah.

This was a problem, because I was hungry. Really hungry.

The class of hunger that's so overwhelming, all you can think about is food. Not shopping. Not boys. Just food.

This is the type of hunger that won't be squashed with your ordinary PB&J.

The kind of hunger that starts off with a desire for cheesecake, then turns into a desire for chocolate cheese cake. Better yet, pizza. No wait, chocolate cheesecake pizza. Can I do that?

I'm going to warn you. This hypnotic hunger spiral never ends well.

In my house, it frequently ends in a messy kitchen. No, I don't mean your ordinary/typical messy kitchen. I mean a kitchen that looks as though a tornado just ran through it, or like you've been robbed. And trust me, not the type of crime committed by a ninja, because ninjas are stealthy. Ninjas don't make messes. Unless you owe them money. Then I can imagine that things get messy.

How does it get so messy you ask?

Well, it begins with me. And then I open the fridge door. And then I start throwing stuff on the counter. Stuff that looks good. Stuff that could possibly make a meal. And then I open the pantry.

I love that word, pantry. Don't you?

My grandma's pantry, it was awesome. It was like a window in the wall with a bright red door.

It was only possible to reach this window in the wall standing on a chair. Once inside, I would hide. Sometimes for hours.

ok, so back to my kitchen.

Imagine. Food is everywhere. I don't even know what's going on. It's like my body has been possessed. I can't think. What do I do? Order pizza?


I went to the fridge and grabbed every vegetable imaginable. No wait, the vegetables are on the counter. What are they doing on the counter?

I grabbed all the vegetable I could, and I grilled them.

That's right. I grilled everything. Was it awesome? Yes it was. Was it manly? You bet. Did I feel like a wussy, grillin greens instead of burgers? No way.

Am I going to do it again? Yep, probably tonight.


Grilling vegetables is cool. And veggie meat. It's also cool.

Oh wait, what else do I see? Portobello mushrooms.

I know what your thinking - Pretty hardcore, right?

It's tricky though. Just don't think you can throw those mushrooms on the grill as is. They need to be spruced up. Oil, and vinegar, and spices, oh my.


The rest of the vegetables are really not hard. Brush them with a little olive oil, and add salt and pepper. You're basically going for a nice char-grilled exterior. The black grill lines are good. That's what you want.

Once the barbecue is hot, grill the vegetables for 5 minutes on each side. The portobello mushrooms take a bit longer. Maybe 8 -10 minutes on each side.

I love how grilling changes the texture of the mushrooms. Yum, so good.

I made a little marinade for my mushrooms. I soaked them for 10 minutes. You can soak yours for longer. I was hungry. There was no time for soaking. I soaked mine in a ziplock bag. It was easy.

Here's the recipe for 2 mushrooms. It is good. Real good.

Ingredients

1/4 cup olive oil
1/4 cup red wine vinegar
couple squirts of Tabasco sauce
salt and pepper
1 tsp dijion mustard
1 tsp Worcestershire sauce

Seattle, Sunday, and 3 of my Favorite Things


Seattle and Sundays, both things I love.

I'm not a creature of habit. I need change. My need for change is so ginormous, that I can't even bear to eat leftovers.

There is one exception though. Sundays. 

I live in Fremont Washington, not California. Fremont is cool. It attracts all the local hipsters.

Every Sunday in Fremont, there's a market. The Fremont Sunday Street Market, to be exact. This market is grand. Every Sunday I go there, because it's right out my front door. This is very convenient.

I start my day with a slice of Veraci pizza. Veraci is cool. They haul out their awesome clay pizza oven, just to make me a delicious slice of pizza. When it's sunny (like it was today), the lineup for Veraci is equally both bonkers and insane.

Speaking of bonkers, what ever happened to that candy?


I then walk my dog to Fuel coffee in Wallingford.  Its only a half hour walk. My dog loves it. All the girls at Fuel swoon over him. He smiles, and walks away thinking, ya I still got it.

I do have to mention, that I think Fuel coffee is the best around.

I drink decaf. Does that surprise you? When I drink regular coffee, I am like a small child all jacked up on sugar. It's messy.

So I drink decaf. The decaf at Fuel is amazing. As well as the regular coffee. My husband drinks the strong stuff, and he still agrees that its the best coffee around.

I love lattes. This is what I drink. Decaf soy milk lattes. So delicious. So Nice. So Soy.

If you like your coffee creamy and not too bitter. You will love this place. If you can, go there now. You will not regret it one bit.

I finish up my Sunday routine with ice cream. So far, this day has been super healthy, I know.

Molly Moon's Homemade Ice Cream is super crazy popular. People will lineup for hours for this stuff. Molly Moon's is in Wallingford, but they often drive their ice cream truck to Fremont. Practically in front of my house. I know, too awesome - right?

Molly Moon's ice cream is grand. The have super funky flavors. Strawberry rhubarb sorbet pictured below.

If you want to check out some of their awesome flavors, go here.

I hope you've enjoyed a day in the life of The Flourishing Foodie.

It's all fun and games around here.


Peru - Cusco and the Sacred Valley


Peru was amazing. After a hella long journey, we flew from Seattle to Dallas to Lima to Cusco, then took a cab ride from Cusco to the small town of Pisac, where we put up our feet, relaxed, while we acclimatized to the altitude change. Well, at least I did. Brent and Jag decided to drink Pisco Sours into the night while running around the town like school children. The next morning we woke, I feeling great, and them with pounding headaches. We're not sure if it was the altitude or the drinks either way, I win. We stayed at the most adorable little spot - the Pisac Inn. It was cozy, the staff friendly, and the food fantastic. We spent our days in Pisac wandering around the ruins, checking out the local market, and exploring, and the nights were spent drinking Pisco Sours by the fire, while enjoying the local Andean music. Pisac was laid back and quaint, the perfect setting to get our barring's and prepare for our journey to Machu Picchu.

We spent a couple of days in Pisac, before heading to Ollantaytambo.


Mixed Bean Salad with Dried Cranberries

Yum, beans, a vegetarian's best friend.  Also, a Mexican's best friend. Oh wait, I've got it, a vegetarian Mexican's best friend.

Beans, my best friend, until I eat them at least twice a day for a week straight, and then I don't seem to have any friends.

I bought the ingredients to make my favorite bean salad. I made it on Tuesday.
I made a lot of it - I always do.

My husband, he is a super crazy hard worker. The past few weeks, I've hardly seen him.  Maybe it's because of the beans, I don't know.

Tomorrow, we (husband + me) are leaving for 3 weeks.

In an attempt to empty out the fridge, I've been trying to devour everything in sight. This was a big task. I think it might have been too big a task.

This task was too big, because on Sunday, I went grocery shopping. I was hungry. I bought a lot.

This week, I thought he (husband) would be around to help devour this house. Nope, just me.


The good thing is that I think I've averaged around 35 - 40 g of fiber per day. Awesome right?

Fact: women between the ages of 19 - 50 should be getting 25 g fiber per day.

Did you know that I love fiber? I used to be a GI (Gastrointestinal) Dietitian, and I would talk about fiber all day long. Also poop - but you probably didn't want to hear that.

Mixed Bean Salad with Dried Cranberries Recipe


Ingredients

4 cups beans (mixed)
1 head of celery, chopped
1 red pepper, chopped
1 cup cran raisins
4 cloves garlic, pealed
1/3 cup olive oil
1/2 cup balsamic vinegar
1/3 cup maple syrup
1 tbsp salt
2 tsp pepper

1. In a large salad bowl, combine the beans, chopped celery, chopped red pepper, and cran raisins.

2. In a food processor, blend the garlic, olive oil, balsamic vinegar, maple syrup, salt, and pepper. Mix the dressing into the salad and let sit overnight in the fridge. This allows the dressing to soak into the beans.


Homemade Sourdough Starter and Bread

10 days ago I committed.

I committed to a slimy, sticky, sour group of creatures. I committed to raise, feed, and take care of them for as long as I possibly can.

The chances are good, that I will probably get bored and kill them in a couple of months, but for now, I am committed.

Did I forget to mention that I am growing yeast - not puppies.

I'm going on vacation in 1 week, and I asked a friend if she could feed my yeast. I'm not gonna lie, it sounded weird.


Do people name their yeast? Is that weird?

It's not like you can name all of your yeast. I mean, they live in a colony of thousands. I guess I could name the colony. Your right, still weird.

Now, let me tell you how to grow some yeast.

No more tangents. I promise.

No, that's a lie. I can't promise. Remember, I'm the girl with the short attention span.

I'll try though. Really, really, hard. Just for you.

Did you know that sourdough bread is the oldest and most original form of leavened bread?

It's simple. Mix flour with water and let it sit at room temperature. The yeast in the air will land in the mixture and eat the natural sugar, producing lactic acid. This gives sourdough its "sour" flavor.

Who knew that we had so much yeast floating around in the air? Very cool, yet kinda disturbing.

6-Day Starter Growing Guidelines

Day 1 - Mix 1 tsp of (whole wheat or rye flour) + 1 tsp warm water in a small bowl and cover with Saran wrap. Make sure you poke tiny holes in the Saran wrap, so the starter can breath. Let it sit for 24 - 36 hours in room temperature. You want your yeast to bubble, foam, and double in size.

Day 2 - When the mixture has bubbled, foamed, and doubled, your starter is active and it's now ready to add more flour. Add 1 tsp whole wheat flour + 1 tsp warm water to the mixture. Cover with Saran wrap and let sit for 24 hours. Again you want you starter to double in size each feeding.

Day 3 - When the starter has doubled, add 2 tsp whole wheat flour + 2 tsp warm water to the mixture. Cover with Saran wrap and let sit for 24 hours.

Day 4 - When the starter has doubled, add 4 tbsp whole wheat flour + 4 tbsp warm water to the mixture. Cover with Saran wrap and let sit for 24 hours. At this point, you will need a larger bowl.

Day 5 - When the starter has doubled, add 8 tbsp whole wheat flour + 8 tbsp warm water to the mixture. Cover with Saran wrap and let sit for 24 hours.

Day 6 - When the starter has doubled, add 3/4 cups of (all-purpose flour) + 3/4 cup warm water to the mixture. Cover with Saran wrap and let sit for 24 hours. Hopefully, you should now have roughly 2 cups of sourdough starter.

Feeding the Starter

People suggest that you must leave your starter on the counter in a relatively warm area, and feed it twice a day for the fist 3 months to develop a healthy strain. I do not have this much time and dedication, therefore, I immediately put mine in the fridge.

If your starter is in the fridge, they say you should feed it every 1 to 2 weeks.

To feed the starter you must add an equal amount of flour and half water.

Example: 1 cup starter + 1 cup flour + 1/2 cup warm water
         1/2 cup starter + 1/2 cup flour + 1/4 cup warm water

When you are ready to feed the starter, take it out of the fridge and discard until you have 1 cup left. Add 1 cup of flour and 1/2 cup of water to the starter and stir. Cover with Syran wrap (with tiny holes poked in the top) and let sit until it has doubled in size. If this doesn't happen in 12 hours, repeat the process until it has.

Once it has doubled, put it back in the fridge until the next feeding.

Using the Starter

Once you are ready to make bread, remove the starter from the fridge.

You want to feed the starter just before using it. Follow the instructions above for feeding your starter. You want to finish with 3 cups of starter.

Once your starter has doubled in size, remove 2 cups for the bread and put the remaining back in the fridge.


Sourdough Bread Recipe (makes 2 loaves)

Ingredients

5 cups of all-purpose flour
1 1/4 cups of water
2 cups of sour dough starter
1 tbsp salt or more for taste

1. Mix the flour, water, and expanded sourdough mix in a bowl. Cover, and let rise for 20 minutes. Add the salt and knead for 15 minutes. Cover and let rise, double in size, for 4 - 8 hours.

2. Cut the dough in half and shape your loaf. I shaped mined into a round disk. Place it into a bowl to rise for 2 - 4 hours, covered with Saran wrap.

3. Place a pizza stone in the oven at 500 F for 20 minutes (bottom rack). Place a roasting pan filled with 1/3 inch of water on the top rack, above the pizza stone, for 10 minutes.

4. Turn the oven down to 425 F, and place the dough on the pizza stone. Shut the oven door. 30 seconds later open the door, just a crack, and spray the sides of the oven with water. Repeat this 3 times, every 30 seconds. Bake the bread for 45 minutes, or until light brow. If you have a thermometer, bake until the bread is 200 F.

Quinoa Pasta with a Tomato Rose Sauce


Celiac disease is a disorder resulting from an immune reaction to gluten.

Gluten is a protein found in wheat and related grains (oats, barley, couscous, and rye).

Anger and/or rage are the 2 feelings I would probably have, if I were diagnosed with celiac disease.

What would I eat if I had celiac disease? QUINOA PASTA BABY. It is sooooooo good. Almost as good as chocolate. Note to self: eat more chocolate.


I buy my quinoa pasta at Fred Meyers, but I'm almost positive that any grocery store with a gluten free section will sell it. They're crazy if they don't.

The modern day grocery store has made a huge transformation in the past 20 years. Nowadays, you go to the grocery store and end up leaving with underwear, life insurance, a television, and a diamond ring. Meanwhile, all you wanted was a pint of milk.

My grocery store has a bank, a pharmacist, an eye doctor, day care, a photo lab, a jeweler, an insurance broker, a florist, a baker, and a deli. The list doesn't stop here, but I figured, we don't have all day.

When I was young, the highlights of my local grocery store were the coin operated horse, the 25 cent candy/sticky-hand machine, and the free slice of bologna at the deli. I must have really liked it there, because most of my fondest childhood memories were at the grocery store. You see, I lived in a house, in the country, in a forest, on a dirt road. The grocery store, to me, was like a theme park to a city kid. Major fun.


Enough about my childhood, lets get back to the dish at hand.

10. The amount of minutes it takes to make this dish, unless your stove breaks, your kitchen explodes, or you get abducted by a robot ninja. To be quite frank, these are all possibilities. I mean, you might want to think about robot ninja proofing your house, just a thought.

2. The amount of minutes it took for husband to eat this dish. He really needs to slow down, doesn't he?

100. The score this dish gets on the delicious scale.


Quinoa Pasta with a Tomato Rose Sauce Recipe (serves 2)

Ingredients
4 oz dry quinoa pasta
2 tbsp olive oil
1/4 sweet onion, sliced
1 cup cremini mushrooms, sliced
1 tomato, sliced
1/4 tsp salt
1/4 tsp pepper
1/4 tsp garlic powder
1 tbsp white whine
1/3 cup heavy cream
2 tbsp tomato sauce

1. In a large saucepan, bring 4 cups of water to a boil. Add the pasta, and cook for roughly 10 minutes. The pasta should be soft, but not falling apart soft.

2. While the pasta is cooking, saute the onion in olive oil for 5 minutes on medium heat. Add the mushrooms and tomatoes and cook for 3 more minutes. Turn the heat to medium high and add the wine.Cook for one minute.  Next, add the cream, and cook for 1 minute. Add the remaining ingredients, stirring continuously, so nothing burns. Remove form heat and serve on pasta with some Parmesan cheese.


Mango Banana Smoothie with Rosemary


Ahhhh.... smoothies. Fruit, yogurt, milk, and ice - POW, smoothie. Four weeks ago I ate like a bird. If you brought me a smoothie for breakfast, I would be happy, really happy. Nowadays, I'd be delighted to drink a smoothie for breakfast, as long as its served with bread, cheese, eggs, and fruit - lots of fruit.
If you bring me a smoothie, all by itself, I will cry. Not on the inside, probably out loud. I'm a baby, just ask my husband.


I know what your wondering. Does she have zombie robot ninja baby living inside her? I can't say for sure, but I'm pretty positive that this is not the case.

Four weeks ago, I did the impossible. I joined booty camp. That's right, B-O-O-T-Y camp.

Now my booty looks great - I think. Well, I'm definitely stronger. This is apparent by my new-found ability to do 20 pushups. Rarh.

Boot camp ends this week, but that's ok, because I am going to South America.
Don't worry, not permanently.

I will still write. Specifically about food. And possibly about my whereabouts and shenanigans. If you like?

While I'm away, my posts will probably not include recipes for food, but they will contain recipes - for fun.


Mango Banana Smoothie with Rosemary Recipes (serves 2)

Ingredients
1 cup frozen or fresh mango
1 banana
1/2 cup plain yogurt
1/2 cup vanilla almond milk
1 spring of rosemary

1. Put all of the ingredients in a blender and puree.

[This is the easiest recipe I have ever written]

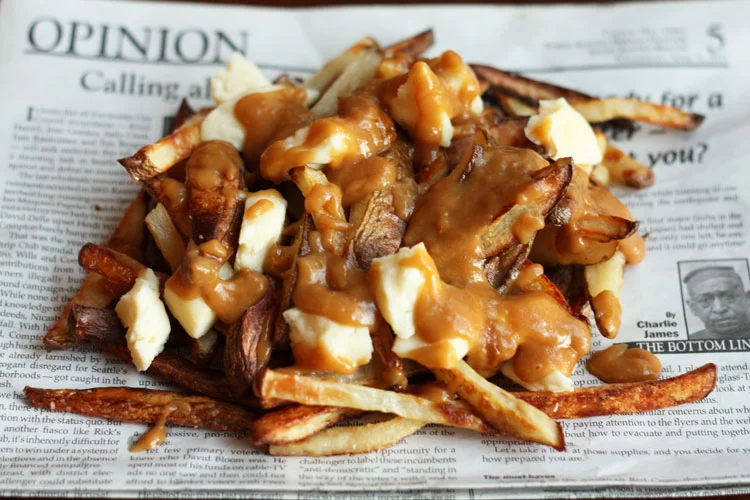
Vegetarian Poutine

Vegetarian Poutine

With all this nice weather around here and talk of my family, I decided to make a familiar snack - poutine. Poutine is an authentically Canadian dish. It originated in the French-speaking province of Quebec. Poutine is made by taking french fries, sprinkling them with cheese curds, and drizzling gravy over the top. It is a magical combination.

Strawberry Shortcakes

Yesterday, I got bored. I often get bored. I blame this on; a) constant need for change, b) constant need for stimulation, and c) short attention span. What to do? Eat chocolate? No wait, I just ate chocolate. Do yoga? One problem, today I'm lacking gusto. Hmmmmmm.....shopping No....... yes....... no....... yes...... no........ YES. Self-control = 0 vs Self-indulgence = 1 Shopping will be fun, but what shall I buy?  A puppy? No, bad idea. Ody (my dog) + _____ (new dog) = poop x 2 - no thanks. A xylophone? Wait, do I really want a xylophone or do I just really like saying xylophone? What about a banana-phone? Also, cool name, but no, I don't think I need a banana-phone.  A cookbook?  Do I really need a cookbook? This is questionable. Do I really want a cookbook? Definitely. This dilemma, the whole need vs want thing, seems to be a reoccurrence in my life. I've determined that my desire to want is way stronger than my actual need.

So now that we've determined I want a new cookbook, how does one decide? There is so much to think about; baking vs frying, italian vs japanese, Jamie Oliver vs Gordon Ramsay.

Undoubtedly, I picked the big, pretty one, with lots of pictures and BAKING in large letters on the cover. That's how you lure in the girl with a constant need for stimulation and low attention span.

Baking by James Peterson, this is the winner. It's fun and pretty and I like it.

STRAWBERRY SHORTCAKE RECIPE
makes 8
inspired by Baking by James Peterson

INGREDIENTS
2 cups flour
1/4 cup granulated sugar
1 tsp baking soda
1/2 tsp salt
1/2 cup of cold butter
1 egg
3/4 cup buttermilk
2 pints strawberries
1 cup heavy whipping cream
1 tbsp sugar
1 tsp vanilla

1. Preheat oven to 375 F.

2. In a food processor, pulse flour, sugar, baking soda, and salt. Finely chop the cold butter into 1/4 inch slices. Add the butter to the flour mixture, and pulse until it has turned into pea size pieces.

3. In a separate bowl, mix the egg and butter milk. In a large bowl, combine the flour with the buttermilk mixture. Don't over mix. Plop the dough onto a well floured work surface, and knead until it sticks together. Don't over knead. You want the dough to be manageable. Separate the dough into 8 balls. Flatten the balls into disk shapes, and place on a parchment covered baking sheet. Brush the top and bottom of the dough disks with buttermilk.

4. Bake for 20 - 25 minutes or until light brown.

5. While the biscuit are baking, prepare the chantilly creme. Pour 1 cup of whipping cream, 1 tbsp sugar, and 1 tsp vanilla in a bowl and place in the refrigerator (including the mixing beaters), for 5 minutes. You want the whole kit and caboodle to stay cold.

6. Remove from fridge and beat with an electric hand mixer on low speed.  Once the cream starts to thicken, turn up the speed to medium. Once the cream starts to form soft peaks, stop. This is the your desired consistency.

7. Once the biscuits are done, slice them in half. Line the bottom with strawberry slices, and top with a few dollops of whipped cream.


Goat Cheese Stuffed Tomato with a Balsamic Dressing


Back in the day, when I was a student, I used to frequent an establishment called the Sugar Bowl. They made the most delicious goat cheese stuffed tomatoes.

The Sugar Bowl is in a city called Edmonton, in a province called Alberta, in a country called Canada.

I lived there, in Edmonton, not the Sugar Bowl.

In Edmonton, they have underground tunnels, because it's to cold to be outside. When I lived there, it was so cold, I rarely left the house. When I did, my eyeballs froze.

Now I live in Seattle, and it rains. Today, I did boot camp, and it rained. Damn rain.


Last night, I made goat cheese stuffed tomatoes. All you need for this recipe is tomatoes and goat cheese. Oh, maybe some oil.... and salt... and balsamic vinegar. But I swear, that's it.

You can serve the tomatoes with a baguette, or bread sticks, or crackers, and maybe some wine. They can be served as a main or an appetizer. Either way, they are incredible. Incredibly delicious.

Ingredients
2 tomatoes
4oz goat cheese
1 tsp olive oil
salt and pepper

Balsamic Dressing (mix the following in a small bowl)
1 tbsp olive oil
1 tbsp balsamic vinegar
1 tsp honey

1. Preheat the oven to 350 F.

2. Cut a medium sized hole in the top of the tomatoes, and scoop out the guts.

3. In a separate bowl, combine the cheese, olive oil, salt and pepper. Stuff the tomatoes with the goat cheese mixture, and place in a baking dish. Bake for 15 minutes, or until soft. Turn the oven to broil, and cook for the last 5 - 10 minutes, or until cheese has browned.

4. Remove from oven and drizzle with the olive oil, vinegar, and honey mixture.


Banana Chocolate Chip Muffins with Streusel Topping

9:00 am - Way to early, lacking creativity, must rely on the interweb for help.

9:30 am - Discover "

The Quest for the Perfect Banana Muffin

". Perfect, I like quests.

10:00 am - Kitchen explodes into a sea of flour, egg shells, and banana peels - this is normal.

10:30 am - Time for the magic to happen.

11:00 am - Now, wait patiently for muffins to cool. This is too hard, I give up. OUCH, burnt mouth. This was predictable.

11:10 am - YES, the best banana muffins ever.

You wanna to know what makes these the best banana muffins ever? Banana, a whole lot of it.

Chocolate, also a whole lot of it. Maybe some love. Love couldn't hurt.

[Print Recipe]

Banana Chocolate Chip Muffins with Streusel Topping Recipe

{adapted from

Prepared Pantry

}

Ingredients

2 1/2 cups all purpose flour

1 tbsp baking powder

1/2 tsp baking soda

1/2 tsp salt

2 1/2 cups ripe mashed banana

1/2 cup granulated sugar

1/2 cup sour cream

1/4 cup vegetable oil

3 large egg yolks

3/4 cups chocolate chips

Streusel Ingredients

1/3 cup chopped pecans

1/3 cup brown sugar

2 tbsp flour

1/2 tsp cinnamon

2 tbsp butter, melted

Directions

1. Preheat the oven to 400 F.

2. In a small bowl mix together the streusel toppings and set to the side.

3. In a large bowl combine the flour, baking powder, baking soda, and salt.

4. In a separate bowl, beat the banana, sugar, sour cream, vegetable oil, and eggs yolks with a hand mixer.

5. Combine the wet into the dry ingredients, and stir in chocolate chips. Do not over mix. Fill muffins cups to the top. Scoop a tbsp of the streusel on top of each muffin.

7. Bake at 400 F for 8 minutes then reduce heat and and bake for 10 - 15 more minutes at 350 F.