Arugula, Tomatoes, and Grana Padano

Dear Friend, Today has been a lazy day. I wish you were here to motivate me. I really haven't done much. This morning I woke up and made my sister-in-law {A.H} a good-bye breakfast. This afternoon I got my hair cut and then I picked my friend up from the ferry. I last saw this friend two days ago, leaving the San Juan islands on a tiny sail boat, with no wind, no motor, and one small paddle. I'm glad he made it back to Seattle and is not lost at sea.


This morning I made my bed, brushed my teeth, yawned, stretched, and then made A.H. a tomato and arugula toasted baguette, with cheese and olive oil. It just seemed right. I think she really liked it. Last night we went out for pizza. Best darn pizza around. I wanted her to order the tomato and arugula pizza, but she really loves mushrooms. She ordered the mushroom pizza. It was also great, but not as great as the tomato and arugula. This morning, I felt as though I needed to convince her that tomatoes and arugula are meant to be. Lovers really. I think she agreed.

Tomatoes, arugula, cheese, and bread are my go-to snack/breakfast/lunch/dinner. Hot toasty bread, warm juicy tomatoes, salty cheese, drippy olive oil, and spicy arugula. Oh my gosh. I am urging you to try it. Once you take your first bite, you will probably dance, and likely sing. Because you will be truly happy with what's going on in your mouth. It will be magical. and delicious. Magically delicious.

Promise.


[Print Recipe]

ARUGULA, TOMATOES, AND GRANA PADANO ON TOASTED BAGUETTE RECIPE makes 8 halves

Ingredients
1 baguette
2 large tomatoes
grana padano cheese
arugula
olive oil
salt and pepper

Directions

1. Turn the oven to broil.

2. Slice the baguette into 4 quarters, and then cut in half.

3. With a vegetable peeler, thinly slice some grana padano. Layer it on top of the baguette. Place the baguette slices on a baking sheet, cheese side up, and broil for 5 minutes.

4. Next, place a slice of tomato on top of the melted cheese. Broil for 5 more minutes.

5. On top of the tomato, add some arugula leaves and grana padano shavings. Drizzle with olive oil, salt, and pepper and serve.


Thin Mint Cookies

When I was a young girl, my parents enrolled me in brownies. I remember despising my 'brownie' outfit, the ugly brown dress, the lame orange scarf, the sash that used to fall off when walking, and the obnoxiously itchy stockings. My mom always made me wear leotards/nylons whenever I wore a dress. What's up with that? I think back in the day, it was probably considered a faux pas to be caught with your bare legs showing. I remember thinking that when I was old enough to dress myself, I would never wear stockings again, and I haven't. True story. I did think brownies was pretty awesome though - besides the attire. One summer I went away for the weekend on a brownie retreat. We went 'fake camping', as in slept indoors and had a fake fire with tissue paper for flames. That weekend, I lost my favorite pink blanket.  I remember thinking that I had lost a piece of my childhood, that I was no longer a kid with a blanket, just an older kid with no blanket, who knew how to make a fake fire.

I wish I had of been interested in gymnastics, ballet, rock climbing, snow boarding. Something cool. If I had of taken gymnastics, then I would probably be able to do a cartwheel, a handstand, or the splits. In the past month or so, I've been making many attempts to stand on my hands and force my legs into the splits position, but being upside down is weird, and I'm pretty sure it is completely unnatural for my legs to split in that manner. Or maybe if I had of been enrolled in boy scouts, I would know how to tie a thousand knots and make a real fire. Totally kidding, I know how to make a real fire. When I was growing up, me and my family lived in the forest. I was basically a boy scout. I was more bad ass then any of the boys I knew. My dad taught me all sorts of survival skills, like never eat anything in the forest. Probably saved my life a couple of times.

After brownies, I graduated to girl guides. I don't remember many details of girl guides, or even what we did for that matter. My only memory was winning 'best costume' at a girl guide Halloween party. I was dressed as a vampire, and it totally rocked, true blood style. That year, my sister went as Cleopatra. My mom spent weeks making her costume, and I was so jealous. What a brat I was. The only other thing I remember about girl guides, was those cookies. I hated selling them, but I loved eating them. When I was a girl guide, we only had chocolate and vanilla. A couple of years later, they upgraded to chocolate mint. To be honest, I'm glad I was past my girl guiding days when they introduced the chocolate mint cookies. I would have likely eaten to many and made myself sick. I know this too be true, because my dad once got a case of Cadbury cream eggs from work. I remember there being like a thousand cream eggs {when I was young, any number over 20 was like a thousand}. I would bring them to school and hand out to my favorite friends, while also trying to lure in new ones. Now, the thought of a cream egg makes me feel a little queasy.

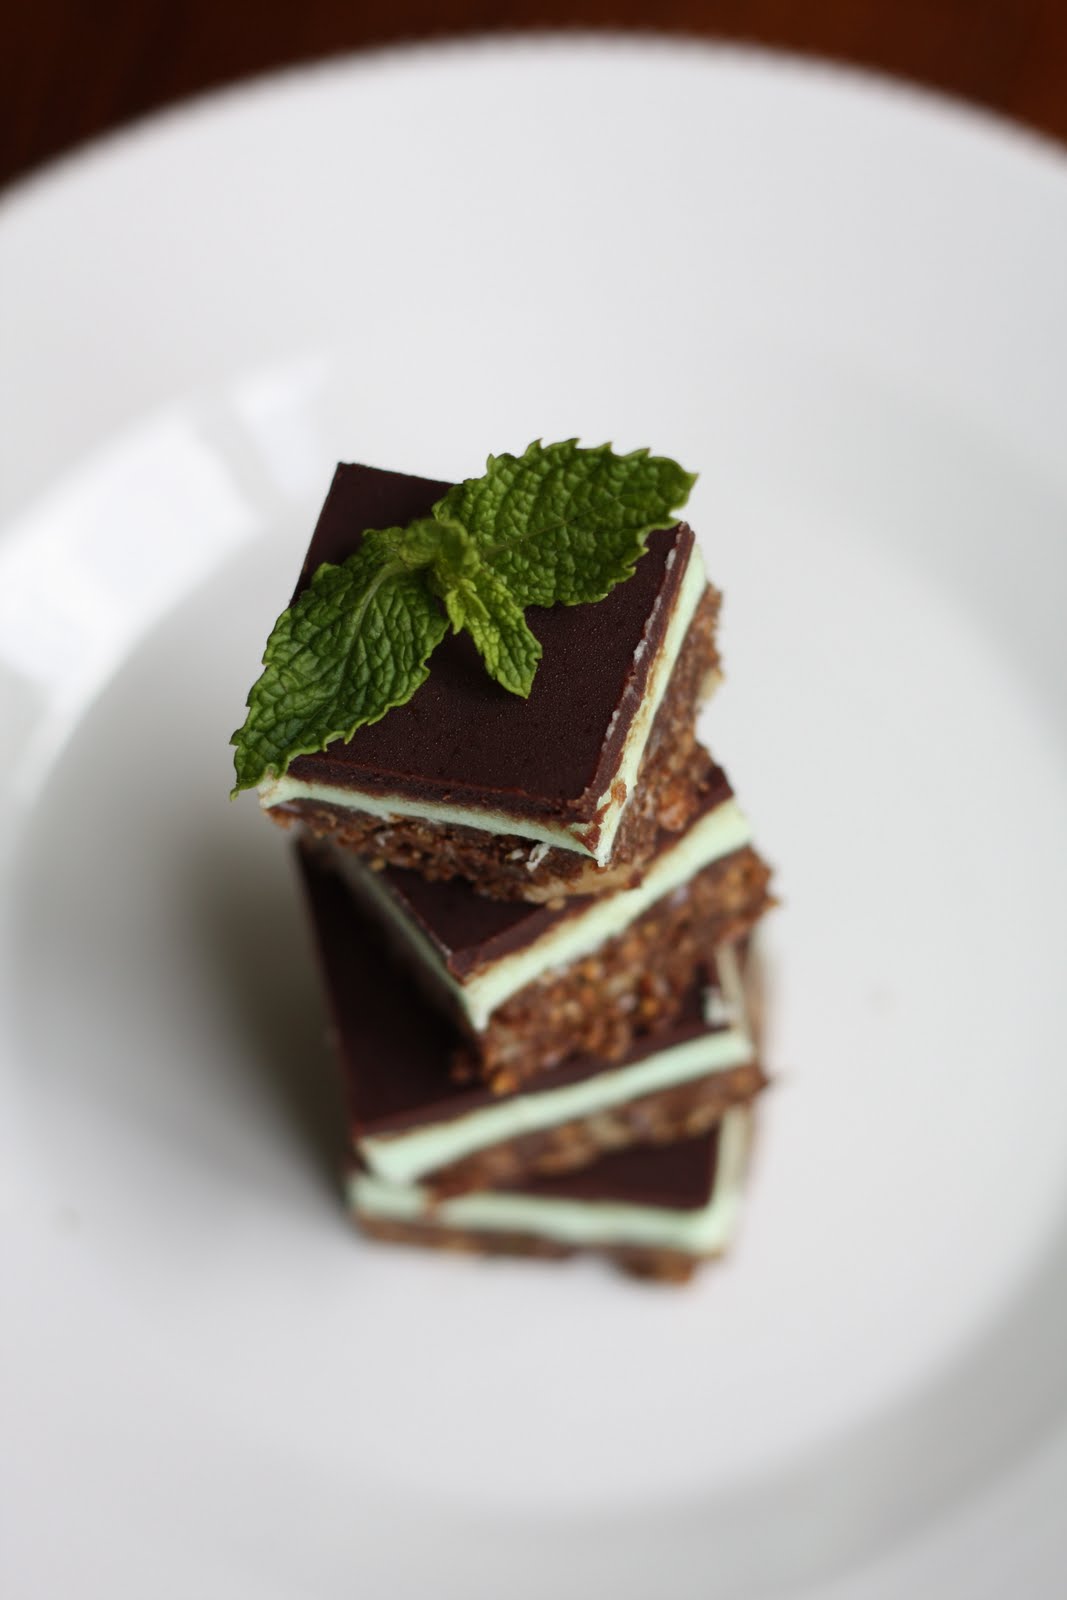
The other day, I had a craving for chocolate mint girl guide cookies. I am on a total mint kick. Chocolate mint ice cream, cup cakes, brownies, fudge - I just can't get enough chocolate mint. I made these cookies, and I think they have satisfied my craving. I no longer feel the need to cover everything in chocolate and mint. These cookies are absolutely wonderful, displaying the perfect ratio of chocolate to mint. The cookie wafer is crispy, chocolaty, with a slight hint of salt. Once dipped in chocolate, the cookie becomes cool and minty. Four adjectives to sum up these cookies - crispy, minty, sweet, and salty. How many days it will take to eat all of these cookies - two. On a scale of 1 to 10, how awesome are these cookies - ten. On a scale of 1 to 10, how awesome are you - ten.

[Print Recipe]

THIN MINT COOKIE RECIPE
makes 36 cookies
recipe adapted from 101 Cookbooks

Ingredients
8 ounces of butter, room temperature
1 cup powdered sugar
1 tsp vanilla extract
1 cup cocoa powder
3/4 tsp salt
1 1/2 cups whole wheat pastry flour
1 package (12 oz) of semi-sweet chocolate chips
1/4 tsp peppermint extract

Directions

1. In a large bowl, beat the butter until light and fluffy. Add the powdered sugar and continue to mix until creamy.

2. Add the vanilla extract and the cocoa powder and mix until the consistency of chocolate frosting.

3. Add the salt and whole wheat pastry flour, and beat until the dough sticks together but is still a bit crumbly.

4. Drop the dough onto a floured surface and knead together to form a ball. Flatten into a disc and wrap in Saran wrap. Place in the freezer and let chill for 20 minutes.

5. Preheat the oven to 350ºF. Line a baking sheet with parchment paper.

6. Take the dough out of the freezer and place it between two pieces of parchment paper. Roll out the dough 1/8 inch thin. With a cookie cutter, cut out your desired shapes. If the dough becomes to soft to lift the cookies onto the cookie tray, place the rolled, cut dough on a baking tray, and place it back in the freezer for 10 minutes. The cookies should then peel off of the parchment paper with ease.

7. Bake the cookies for 10 minutes. Let cool for 30 minutes.

8. In a double boiler, melt the chocolate chips with the peppermint extract.

9. Dip the cookies into the chocolate and place on parchment paper to dry. To speed up the cooling process, place the cookies in the fridge or freezer.


Rainbow Birthday Cake

Rainbow Birthday Cake

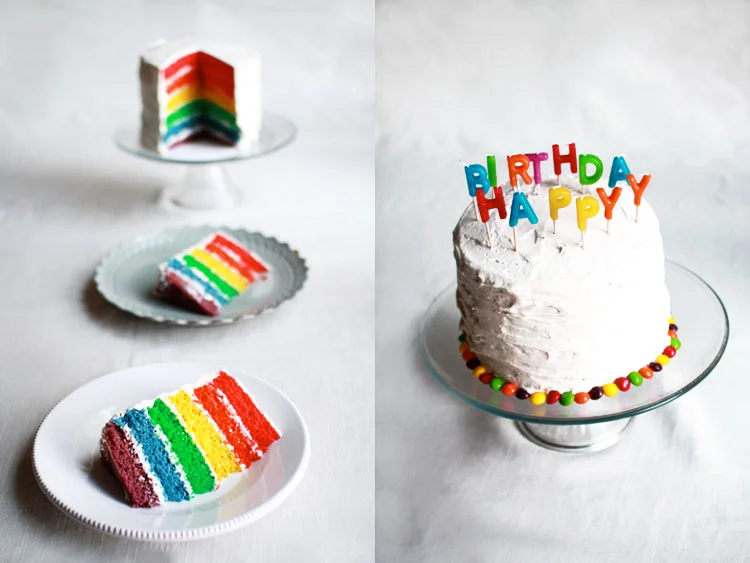
This cake was some serious eye candy. A major flavor explosion for your eyes. In order to pull this magic together, I used a classic vanilla butter cake recipe with a vanilla buttercream frosting. The cake was sweet, perfect for a child's birthday party or a husband's surprise Mexican themed party. It was a fluffy, moist, melt-in-the-mouth kind of cake. If I had to sum it up, I would say it tasted like a rainbow is supposed to taste.

Potato and Cheese Pierogis

Dear Friend,

Every so often, I wake up feeling ambitious. Today, this was the case. Instead of going to the freezer and pulling out a bag of frozen, pre-made, store bought pierogis, I decided to make you some from scratch.

I remember you saying that you've been craving some sort of dumpling filled bundle of goodness for weeks. Last night, at 2:00 in the morning, I was flipping through an old-school copy of Fine Cooking. I stumbled upon a mouth watering recipe for pierogis, and of course, my initial Pavlovian response was to drool. My second response was to put on an apron, but because it was 2:00 am, I went to bed. I then woke up this morning wearing an apron?!?!

I vividly remember my first pierogi experience. It was late afternoon. I was on my way home from an exhausting day of multiplication. I was sitting at the front of the big yellow bus. This is where I sat, because I loved my bus driver. I was sitting with a close friend, whose family was from Polish descent. Out of her cabbage patch kid lunch pail, she pulled a cute little potato and cheese filled bundle. It was completely foreign to me. Honestly, if you weren't serving Kraft dinner, hot dogs, or frozen fish sticks, it was going to be foreign.

At the time, I was so excited by this experience. It felt so wonderful to be trying something new. Little did I know that the feeling of excitement and appreciation for all things food, would become a part of who I am today.


From what I understand, there are two ways to make pierogis. The first method involves rolling out the dough, sliding it through a pasta maker, then cutting out small circles with a pastry cutter. This method ensures your pierogis will have a uniform thickness and shape.

The second method is to pinch off small pieces of dough, roll them into small balls, and then individually roll them out with a rolling pin. This is how I chose to do things, because to be quite honest, I don't own a pasta maker, and at the time it seemed easier.

I went on a whim and assumed that you like diagrams and pictures as much as I do. If you also like to stick your finger in the peanut butter jar when no one's looking, then I'm really getting to know you - this is good.

I took some pictures for you, illustrating how to make a pierogi. I really want you to try to make some at home. Nothing gives me more satisfaction than making things from scratch, and I thought we could share this feeling together.

First you want to pinch off a piece of dough the size of a key lime. Roll the dough in your hands into a round ball. Place the ball on a floured work surface.


With a well floured rolling pin, roll out the dough 3 1/2 inches in diameter and 1/8 inch thick.


Take a scoop of the potato mixture and place it in the center of the dough.


Fold the edges over and press firmly to the outer sides. If you are having difficulty getting the edges to stick, use a drop of water. Press little grooves in the dough with your finger for design. You could also try using a fork. Get creative, this is your moment.


Boil the pierogis for 6 minutes. Take them out of the pot and place on a towel, to dry off the excess water. Fry the pierogis in butter for 2 -3 minutes on each side.


Remove the pierogis from the pan and let them cool long enough so that you wont burn your mouth while eating. For me, this is one minute. For mr. H, this is 10. I'm betting that you probably have the same heat tolerance as me.

Next, grab that pierogi with your hand and use it as a device to scoop up some deliciously rich sour cream - preferably full fat. Don't skimp. The ratio should be 1:1.

Pierogis should have a crisp outer layer, with an ever so slight chewiness. The inside filling should be soft and fluffy, and melt in your mouth.

I suddenly have a gush of emotions remembering that late fall afternoon, on the big yellow bus, the first time I tried a pierogi. I fell in love.


[Print Recipe]

POTATO AND CHEESE PIEROGI RECIPE (yields 40 pierogis)
{recipe adapted from Fine Cooking Magazine}

Ingredients
3 1/2 cups all purpose flour
2 tbsp sour cream
3 large eggs
1 cup water
3 russet potatoes
2 tbsp butter
2 tbsp sour cream
1 tsp garlic powder
1 tsp salt
1 cup grated cheddar cheese
2 - 4 tbsp butter for frying

Directions

1. In a large bowl, beat the flour, sour cream, and eggs with a hand mixer on low speed.

2. Slowly add in the water, and mix until combined.

3. Knead the dough (2 min) using the dropping method (lifting the dough from the surface and dropping it on the counter), be sure to not over-knead. The dough should be smooth. Once the dough is kneaded, cover it with Saran wrap and let rest for 20 minutes.

4. While the dough is resting, peel and chop the potatoes. Boil them for 20 minutes or until they are soft. Drain off any excess water with a strainer and place in a large bowl. Add the butter and sour cream and mash until smooth and creamy. Stir in the garlic powder, salt, and and cheddar cheese. Set to the side.

5. Take the dough and pinch off a small piece, tablespoon size. With your hands, roll into a small ball. Place the ball onto a floured surface, and roll it out (with a rolling pin) into a flat circle, approximately 3 1/2 inches in diameter and 1/8 inch thick. Place it to the side under a damp cloth to prevent the dough from drying out. Continue the process until you've rolled out all the dough.

6. Bring a large pot of salted water to boil.

7. To assemble the pierogis, place a heaping spoonful of the potato mixture in the center of the pierogi circle. Fold over the sides and pinch. If the dough doesn’t stick together, use a drop of water. Keep the pierogis covered with a damp cloth to prevent them from drying out.

8. Once the water has boiled, place 6 pierogis in the pot at a time. Once the pierogis have begun to float, continue boiling for 4 more minutes. Remove from water and place on a towel to soak up the excess water. Make sure the pierogis aren't touching, this will prevent them from sticking together.

9. Next, fry the pierogis in butter, on low-medium heat until golden brown on each side. You can also fry them with onions and serve with sour cream for dipping.

Pierogis can be frozen raw or cooked/boiled. If you are going to freeze them from cooked (boiled), make sure they have cooled first.

Gluten-Free Chocolate Banana Bread

Dear Friend,

Do you remember when I bought $200 worth of gluten-free flour? - that was insane. Do you also remember when my dog jumped on the counter and ate the gluten-free bread? - that was a disaster.

As a result, I don't seem to have any space in my cupboards for non-gluten-free foods..... and my dog is getting fat.

I wish you were here to organize my cupboards. I'm sure you would find room for chocolate and dried cherries. You always did have better spacial organization skills than me.

I also wish you were here to talk some sense into my dog. He's impossible.


For my first attempt at gluten-free baking (and to make some room in the cupboard), I made you some banana bread. I only put a small dent in the gluten-free flour, but it's still a start.

I decided to start with something safe. Something that I've made a million times before. I figured it would be hard to mess up banana bread. Not impossible, just hard.

Luckily, I buy more bananas than I can handle, and almost always have at least 12 in the freezer. I remember you telling me that your freezer is also always stocked with black bananas. Soul mates, you and I.

Sometimes I don't get them into the freezer in time. Last week, I had some super-ripe bananas that exploded in my fruit bowl. True story. I must have had 25 fruit flies in my kitchen.

My sister once told me you could get rid of fruit flies by following these simple steps:

  1. fill a bowl with fruit juice (just covering the bottom)
  2. squirt in a few drops of dish soap
  3. cover the bowl with Saran wrap
  4. poke the Saran with tiny holes

I don't have much room on my counters for a fruit fly trap - my kitchen is so tiny. You try this fruit fly trap first, and let me know how it goes. I think that's fair - I tried gluten-free baking first.

I wanted to write you, to tell you how amazing this banana bread turned out. It's moist, chocolatey, banana-y (is that a word?), and super cool. If you blind-folded me, put me in a taste testing contest, and then handed me this banana bread, I would have said, hands-down, that it was made with wheat flour. No word of a lie.

You should share this recipe with your banana loving gluten-free friends. They will love you, just like I do.

Your truly,

H

[Print Recipe]

GLUTEN-FREE CHOCOLATE BANANA BREAD RECIPE (yields 1 loaf)

Ingredients
1/2 cup butter, room temperature
1 cup granulated sugar
4 over-ripe bananas, fresh or frozen
1 tsp vanilla
2 eggs
1 3/4 cup gluten-free all purpose flour
1 tsp xanthan gum
2 tsp baking powder
1/2 tsp salt
3 tbsp cocoa powder
1/2 cup chopped walnuts
1/2 cup chocolate chips

Directions

1. Preheat oven to 350 F.

2. With an electric hand mixer or stand mixer, cream the butter and sugar until light and fluffy {approximately 5 minutes}.

3. In a small bowl, mash the bananas. If your bananas were frozen, let them thaw, peel and drain off excess water.

4. Mix the bananas into the butter mixture, and add the vanilla. 

5. Mix in the 2 eggs, and beat for 2 -3 minutes until combined.

6. In a separate bowl, mix the flour, xanthan gum, baking powder, salt, and cocoa powder. 

7. Add the dry ingredients to the wet, and then combine with a spatula or wooden spoon. 

8. Add the chopped walnuts and chocolate chips. Stir.

9. Grease a loaf pan with butter or cooking spray. Pour the batter into the loaf pan and bake on the middle rack for 60 minutes. Turn off the oven and continue cooking for 10 more minutes.

10. Remove the banana bread from the oven and let cool for 30 minutes. Remove from the pan, slice and serve. Can be stored in the fridge for a week. 

[If your banana bread falls once out of the oven, it probably didn't cook long enough.]

Blackberry and Nectarine Crisp

Dear Friend,

Yesterday, while on my morning walk, I stumbled upon a sea of blackberries, and I know how much you love blackberries.

Despite the many dangers - leg-mangling brambles, the tired man who had built himself a home amongst the bramble, and that bee who just wouldn't leave me alone - I waded in and picked you some berries.

My attempt to forage for blackberries was not well thought out.

I did not bring a machete, gloves, or a pail. I brought my dog. My dog brought some doggie bags. I filled one of his bags with blackberries. On my way home, people were looking at me strangely. I later realized that it looked like I was carrying one giant dog poop.  True story.


Do you remember that time I got attacked by an army of red ants? I was too busy picking you blackberries to notice that I was standing on an ant farm.  I looked crazy when I ripped off my pants and shirt, and started slapping myself like a maniac trying to get those bitey ants off me.

Funny, not a single person stopped to ask if I was ok.

In the end, I think I ended up making you a blackberry cheesecake. I remember it was good. I remember you wanted 10 more. Probably worth battling the red ant colony, don't you think?

The things I do for you.


I remember you once telling me that blackberries and nectarines should date. That they would make the perfect match. Aesthetically speaking, they are one smoking couple.

Luckily, I just so happened to have some good looking nectarines in my fridge. Nectarines that were perfectly acceptable to eat on their own, but also perfectly acceptable to cover with sugar, and flour, and butter.

I hooked the nectarines up with the blackberries, and something magical happened. A color, texture, and flavor explosion.

I've told you that there were no blackberries where I grew up.

We had blueberries, raspberries and strawberries - although even those were pretty hard to find where I lived.

It was pretty special to discover a wild raspberry or strawberry in the woods. I remember finding my first strawberry and thinking I was so lucky. Of course, I had to share this tiny strawberry with my little sister. I took half and gave her the other, and it was a special moment. A memory worth cherishing.


I found these gorgeous ripe beautiful blackberries and felt lucky. I felt lucky to live in such a wonderful place that overflows into a sea of blackberries every summer.

Of course, I wanted to share these blackberries with you.

I knew they wouldn't last too long, and I couldn't possibly eat them all, so I made you a crisp.

I paired blackberries with nectarines, and butter, and sugar, and made you a sweet treat.

A perfect special summer treat.

Yours truly,

H


[Print Recipe]

BLACKBERRY AND NECTARINE CRISP RECIPE
(yields 1 - 9" round pie plate)

Ingredients
butter for greasing the pan
2 cups nectarines (approximately 6 -7), peeled and cubed
1/4 cup sugar
1 tsp vanilla
2 cups blackberries
1/4 cup all purpose flour
1 cup rolled oats 
1/2 cup packed brown sugar
3/4 tsp cinnamon
1/4 tsp nutmeg
1/4 tsp salt
7 tbsp unsalted cold butter, cubed

Directions

1. Preheat the oven to 375 F.

2. Butter a 9 or 10 inch pie pan or a 9 inch square baking dish.

3. Peel the nectarines using a vegetable peeler or a small paring knife. Cut the flesh away from the pit, and then cut into 1/2 inch cubes. In a bowl, combine the nectarines with the granulated sugar and vanilla. Pour the nectarines into the pie plate and then top with the blackberries.

4. In a food processor, pulse 1 - 2 times, flour, oats, brown sugar, cinnamon, nutmeg, and salt. 

5. Chop the butter into tiny cubes and then add to the flour mixture. Pulse 5 - 10 times, just enough to get the butter evenly distributed. The mixture should be crumbly with small clumps.

6. Evenly spread the topping over the fruit. Place the crisp in the oven, on the middle rack, and bake for 45 minutes. The crisp should start to bubble when done. Let cool on a wire wrack. Serve with a dollop of whip cream or vanilla ice cream. 

Anthropologie Winner!

Congratulations Lexi! You have won the super cute Anthropologie apron.

Make that rhubarb crumb bar. Eat it like you mean it. You deserve it.

I would also like to give a big thanks to {you} for entering this contest.

It was amazing to see all of your favorite recipes. 

While reading through all of your comments, I started to notice a little pattern. Aprons remind you of your grandma, which totally reminds you of your favorite grandma recipe.

Have an amazingly fun and spectacular weekend!

Carrot Soup with Coconut and Lime

Have you ever heard of purple carrots?

No. Me neither.

Apparently, carrots come in a multitude of colors. This is information I did not know.

I wish someone could've given me a heads up. To think I've spent my whole life eating plain old orange carrots.

My food box did me good this week. Peaches, nectarines, cherries, blueberries, and purple carrots.

True story, my purple carrots had been sitting in my fridge for a couple of days and started to wilt.

You can avoid wilting your carrots by cutting the tops off right away. The leaves are greedy and pull water and nutrients away from the plant. duh. Problem solved.

I cut the tops off my carrots and immersed them in ice cold water for 12 hours. They came back to life. This was good news.

I took my crisp, modern, fashionable purple carrots, paired them with a few of their cousins, the orange carrot, and made some soup.


I added some coconut milk, apples, lime juice, and spices. I'm not gonna lie, a total flavor explosion in my mouth.

I experience these same symtoms whenever I eat a  salted carmel brownie. Magical.

It's amazing how the ingredients in this soup pair together. It's like it was just meant to be.

Once, I went to a super swanky party. Someone poured me a glass of wine. It was mediocre at best.

Someone told me to eat some chocolate. I said ok. duh.

This wine went form tasting ok to amazing. All with a little help from chocolate.

Flavor pairing is a wonderful thing.

I once paired a fruit salad with a Hefeweizen. Totally works.


Gosh, look at these cute carrots.

Some people are photogenic. Me, I'm not so photogenic. Unless I've been drinking, then I own it.

Onions. Not so photogenic. Carrots. They've got it goin on. Never a bad shot.


So, today I not only discovered purple carrots, but I also discovered that purple carrots can be orange on the inside.

I once knew this girl that ate so many carrots she turned orange. To think, she could have turned purple!


[Print Recipe]

CARROT SOUP WITH COCONUT & LIME RECIPE ( serves 8 -10)

Ingredients
1 tbsp butter
1 onion, diced
2 garlic cloves, chopped
1/4 tsp salt
1/4 tsp pepper
1/4 tsp nutmeg
1/4 tsp coriander
2 tbsp ginger, chopped
1 granny smith apple, peeled and cubed
2 cups carrots, chopped
6 cups broth
14 oz can of coconut milk
1 lime

Directions

1. In a large pot, fry the onions, garlic, and butter until the onions are translucent and soft {5 - 10 minutes}, on medium heat.

2. Add the salt, pepper, nutmeg, and coriander to the onion mixture. Continue cooking for 1 - 2 minutes.

3. Add the ginger, apple, and carrots.

4. Next, add the broth. Bring to a boil then reduce heat. Simmer for 30 minutes, or until carrots are soft.

5. Puree the soup with an immersion blender or a regular blender.

6. Return the pureed soup to the large pot. Add the coconut milk and lime juice and stir.

7. Simmer for 15 minutes.

8. Served with chopped cashews.

Fish Tacos with Chipotle-Lime Dressing


I totally adore fish tacos.

You could say I am in love. I would probably even leave my Mr. Man for fish tacos.

This was not always the case.


I blame this love affair on my husband. He was the one who introduced us. Now, I am in love, well..... maybe just infatuated.

I bet you'd really like fish tacos. I bet you'd like them even more if they were served out the side-window of a food truck, parked down the street.

I bet you'd double love them if they were smothered in a chipotle-lime sauce.

Now, you may feel embarrassed that the taco truck guy knows you by name. Perhaps you ate fish tacos 5 days in a row last week. But don't worry! It turns out it's real easy to make them from scratch. I mean, you just fry the fish and put it all together. No one's saying we have to make the tortillas from scratch. You and me, we're busy people. True fact.

The key to a good fish taco is good fish. Here in Seattle, we have good fish. It's fresh. It's cheap {excluding halibut}. It's sustainable. We're doing good. We're saving the environment. Doing our part.

Once you've scored some tasty fish, cover it with flour, and egg, and beer and fry it up.

Not happy with your batter to fish ratio? You like your fish with lots of batter? Add more flour.

You like your fish with less batter? Add more beer.


Next, we need to make some sauce. Fish tacos need sauce. It's a must.

A chipotle-lime sauce will definitely do the trick.

{warning: if you suffer from heartburn scale back on the chipotle peppers. take care of yourself}

A little pico de gallo or salsa can add some color. You can make it from scratch, or buy a tub from Fred Meyers. No bigs.

A little lime juice. A sprinkling of nappa cabbage. Yessum.

All packed into a tiny soft warm tortilla. Yes please.


This is my kind of fish taco.

Unfortunately, I'm paying the price today. I didn't take my own advice about scaling back the peppers... love hurts!


[Print Recipe]

FISH TACO'S WITH CHIPOTLE-LIME DRESSING RECIPE {makes 10 - 12 tacos}

Ingredients
1/2 cup light sour cream
3 limes
1/2 tsp sugar
1/4 tsp salt
1 chipotle in adobo sauce, minced
2 tsp adobo sauce
2 - 3 cups vegetable oil
1 lb white fish {I used cod}
1 head of nappa cabbage, shredded
3/4 cup all purpose flour
1 tsp garlic powder
1/2 tsp dry mustard powder
1 tsp salt
1 egg, beaten
1/2 cup {4 ounces} beer
1 cup pico de gallo or salsa
10 - 12 small soft {white or yellow} corn tortillas

Directions

1. In a small bowl, whisk together the sour cream, juice from 1/2 a lime, sugar and salt. With a knife, mince the chipotle pepper. Add it to the sour cream followed by the adobo sauce. Combine. Set to the side. {if you prefer your sauce less spicy, omit the chipotle pepper}. 

2. In a large pot, wok, or deep-fat fryer, heat the vegetable oil on medium for 15 minutes.

3. While the oil is heating, cut the fish into bite size pieces and let soak in the juice of one lime for 10 minutes.

4. Next, shred the lettuce and place in a large bowl. Drizzle with 1/2 lime juice and place to the side.

5. In a large bowl, mix the flour, garlic powder, dry mustard, and salt with a whisk. Whisk in the beaten egg. Next, add the beer and whisk until all the flour lumps are gone.

6. Place the fish in the batter ensuring that each side is evenly coated.

7. To test whether the oil is hot enough, drop a tiny bit of batter into the oil. If the oil starts to bubble and pop, it is ready for frying.

8. Place 5 - 6 pieces of fish in the oil at a time. This will prevent the pieces form sticking together. Fry for 1 - 2 minutes on each side. {you want the pieces to be golden brown on each side}

9. Place the cooked fish on a paper towel to soak up any excess oil.

10. Warm the tortillas in the microwave for 30 seconds. Top the tortilla with 2 -3 pieces of fish, shredded cabbage, the chipotle-lime sauce, and pico de gallo or salsa. {fish taco's are best eaten when the fish is still hot!}

Chewy Chocolate Macaroons

It's been a whirlwind week of sorts.

First, I convinced myself that I have celiac disease.

Then, my doctor told me I have acid reflux.

Next, I convinced him to schedule a celiac test - a small bowel biopsy. He was hesitant, but in the end he went along with it, primarily to get me out of his office.

Then, I bought 200 dollars worth of gluten-free foods.

My husband felt bad for me and baked a loaf of gluten-free bread. It was terrible. I lied and said I liked it.

True story: in order for this biopsy to be accurate, I needed to eat gluten all week. No bigs.

I ate cupcakes for breakfast, cake for lunch. Muffins for dinner and pizza for dessert.

Turns out I have heart burn, not celiac. Go figure.

To celebrate, my dog jumped on the table and ate the gluten-free bread. Now he has diarrhea.

Moral of the story: don't overreact.


This past week, I was riding on an emotional roller coaster, and go figure, I wasn't strapped in. It's true. Ask my husband, my mom, the dentist, the hairdresser, the mailman, the yoga instructor, and my dog.

I was so emotional, I cried every day {at least once}. The mere thought of a life without gluten was too much to comprehend.

Besides crying and moping, I spent most days and nights researching gluten-free recipes. Mostly trying to make sense of guar gum and spelt flour.

Here's what I found: there are a lot of really crafty people out there who have mastered the art of delicious of gluten-free cooking. Here are a few I stumbled across;

Gluten-Free Cupcakes by Elana Amsterdam

Gluten-Free on a Shoestring by Nicole Hunn

100 Best Gluten-Free Recipes by Carol Fenster

The Wheat-Free Cook by Jacqueline Mallorca

I also stumbled across a recipe for macaroons. Heck yes. I love macaroons. Say what? Gluten-free.

Seriously, if you have celiac disease. Gluten intolerance. Wheat allergy. Love coconut. Love chocolate. Have no desire to bake. Don't have a lot of time. Want to impress that cute guy. Want to impress that cute girl. Been a a super crazy drama queen for seven days straight and feel bad for your husband. This is the dessert for you. Macaroons. Totally.

p.s. On the coconut scale, this recipe is a 10. Meaning, 10 times more coconut than your average recipe.

p.p.s. All you need is 20 minutes tops.


[Print Recipe]

CHEWY CHOCOLATE MACAROON RECIPE {makes 20 large}
{recipe adapted from The Joy of Baking}

Ingredients
1 cup semi-sweet chocolate chips
3 large egg whites
1/4 cup cocoa powder
3/4 cup white granulated sugar
1 tsp vanilla
2 1/2 cups shredded coconut

Directions

1. Preheat the oven to 325º F.

2. In a double boiler, melt the chocolate.

3. In a large bowl whisk the egg whites, cocoa powder, granulated sugar, and vanilla.

4. Next, add the melted chocolate and the coconut. Stir.

5. Line a baking tray with parchment paper. Using a spoon, scoop {20 or so} heaping tablespoons of cookie batter onto the baking tray. The cookies do not have to look like a perfect round ball. You {literally} want to plop the batter onto the tray.

6. Bake for 15 minutes. Do not over bake. The cookies should be soft when taken out of the oven. Let cool on a wire rack for  20 to 30 minutes.

Caesar Salad with Homemade Dressing


I managed to acquire one ginormous head of romaine lettuce.

This lettuce was on steroids, for sure.

To be honest, I'm not a big fan of those outer leaves.

Really, they haven't done anything to me, they're just too tough and bitter for my liking.

I love love love the inside bits. The heart to be exact. I guess you could call me a romantic.

Usually, I only buy romaine hearts, but in my food box came this monster lettuce.


Tragically, I ended up composting the outer layers.

It just felt wrong tossing away all that good lettuce.

I felt like a waster. An ungrateful lettuce waster. True story.

Yesterday, I also cleaned out my fridge. I should have saved it for another day, it was too much wasting for my soul.

There were rotten zucchinis, and weird green things, and stuff in tubs, and soup in bowls, and bread in bags.

It all had to go.

After tossing out almost the entire contents of my fridge, I decided to make the most of the day and eat me some green hearts, as in caesar salad hearts.

In my books, caesar salad must meet the following criteria:

the dressing needs to be oily not creamy,

just enough garlic to taste heavenly, while still allowing me to come in close contact with loved ones,

anchovies, don't even think about it,

eggs, back off,

shaved Parmigiano Reggiano, what are you waiting for?


There are many keys to a good caesar dressing. It's like a crazy locked door just waiting to be opened.

The first key is roasted garlic.

The roasting process brings out the sweet caramel flavors, while minimizing that garlic {bite}, otherwise known as the {please don't kiss me right now} bite.

The second key is olive oil. Good olive oil. Fancy olive oil.

I don't mean you need to press them olives yourself. I just mean splurge on the fancy stuff.

There are also some smaller keys; capers, lemon juice, Dijon mustard, salt, and pepper.

Put it all together. Emulsify it up - meaning  - combine the two liquids which normally don't mix easily.

Great.

Now we've got the dressing.

Now we need some romaine hearts, and some good Parmigiano Reggiano {it's a must}. Don't skimp and get the cheap stuff. With so few ingredients, that sweet, creamy flavor of the cheese is most important.

Wash off your leaves. Dry them up. Slice them with a knife into bite size pieces.

On a plate, arrange the lettuce into a small hill-like formation.

Just before serving your salad, drizzle it with dressing and top with shaved cheese.

So good. So very very good.

You'll impress the pants off anybody with this salad.

I don't mean literally. Get your mind out of the gutter.


[Print Recipe]

CAESAR SALAD WITH HOMEMADE DRESSING RECIPE (serves 6 - 8)
{adapted from the Rebar: Modern Food Cookbook}

Ingredients
2 small {1 large} garlic bulb, roasted
1 tsp olive oil
1 tbsp capers
1 tbsp caper juice
2 tsp Dijon mustard
1 tbsp lemon juice
3 pinches of salt
dash of pepper
1/2 cup olive oil
3 - 4 romaine hearts
Parmigiano Reggiano cheese, thinly shaved {with a cheese grater or vegetable peeler}

Directions

1. Preheat the oven to 400 F.

2. Slice off the tops of the garlic. Place on a piece of aluminum foil and drizzle with olive oil, salt and pepper. Wrap the garlic in tin foil and bake for 40 minutes. When done, the garlic should be light brown in color and popping up out of their outer skin. To remove the garlic, squeeze it out {like a tube of tooth paste} from the bottom.

3. In a food processor, blend the roasted garlic, capers, caper juice, Dijon mustard, lemon juice, salt, pepper, and 1/2 cup of olive oil.

4. Wash the romaine hearts and cut into bite size pieces. Plate the lettuce, and just before serving, drizzle with dressing and top with shaved Parmigiano Reggiano.

Cherry Cheesecake Squares


So, you decided to sign up for a local food box program.

Why? Because you thought it would be fun. You thought that it would put you on the {hardcore} list. The {ya, my produce is local, is yours?} list.

But now, your food box comes once a week, and your fridge is looking like green acres.

You hoped your fridge would look more like a beautiful sea of reds, and purples, and oranges. But  instead, all you get is green.

Today, in your fridge, you have 1 ginormous head of lettuce, garlic spears?, zucchini, arugula, green onions, leeks, spinach, and green peppers. I wasn't kidding. Green Acres, for sure.

Last week you ordered raspberries, rhubarb, and cherries.

The rhubarb came, and it was green. Great. Toss it with the rest, in green acres.

The raspberries came and they were moldy. Great. Toss them in the compost.

The cherries came and they were soft.

Come on. Seriously?


Ok, so seeing as chocolate and cheesecake are your two favorite desserts. And well... you made brownies last week. Might as well stay on the dessert train and make a cherry cheesecake. Uhm, I mean, cherry cheesecake dessert bars. They're different, right? Also, we need to use up them cherries.

Here's a trick. Whenever you're left with an abundance of fruit that is either super ripe, or just looks unappetizing {blemishes, bruises, etc.}, chop it up. Add some sugar. Boil it up. Pow. Heavenly.

And then you make some sort of dessert, because, well...... dessert is like a serving tray for fruit.

To make your cherry serving tray, you will first need graham cracker crumbs. Or mashed up graham crackers. same thing.

Take a minute. Smell the graham crackers. Aren't they heavenly.

Now, melt some butter on the stove top, or in the microwave. Your preference.

Some people feel weirded out by microwaves. Just saying.

Mix the butter and grahams together like they were meant to be.


Line a pan with tin foil, because it just makes life easier. Don't forget to recycle that tin foil when you are finished.  Reduce. Reuse. Recycle.

Smush them into a pan and bake. Mmmmm, don't you love the smell of toasty graham crackers.


Next. Grab them cherries. Wash them up. Pull off their tails. Remove the seeds with a cherry pitter or your hands.

This is messy business. Too messy to photograph! Instead, I will show you a picture of the prettiest cherries in the bunch.


After you have pitted the cherries, boil them with water, sugar, lemon juice, and cornstarch, and watch it thicken.

Soon your cherries will have the same consistency as canned cherries. Magic.

I used a mixture of Bing and Rainier cherries.

They were both {grrrr} soft and overripe. It was a must.


Once your crust is baked and your cherries have thickened, it's time to make some cheesecake squares.

First you need some cream cheese. Preferably full fat.

Don't be like me and waste 10 minutes at the grocery store, staring at the low-fat then full-fat, then low-fat then full-fat.

It's cheesecake squares dangit. Just get the full-fat.

Mix the cream cheese, sugar, flour, vanilla, and eggs until it's smooth and delicious. Smooth enough for a cheesecake party.

Spoon the cream cheese mixture onto the crust. Top it with the cherries. Bake it up. Let it cool for 3 hours. Way too long, I know.

If you attempt to cut the cheesecake squares before they have cooled, you will be left with a mess.

Maybe that's what you like? That's cool.

Cheesecake squares are awesome. Especially with fresh cherries. And..... you don't need that fancy cheesecake pan. 

[Print Recipe]

CHERRY CHEESECAKE SQUARES RECIPE

Ingredients
1 1/4 cups graham cracker crumbs
4 tbsp butter, melted
3 cups of fresh pitted cherries
1/4 cup water
1 cup granulated sugar
1 tbsp lemon juice
2 tbsp corn starch
20 ounces cream cheese {2 1/2 packages}, softened
1 cup confectioners sugar
2 tbsp flour
1 tsp vanilla
2 eggs

Directions

1. Preheat the oven to 350 F.

2. Line a 9 X 13" baking dish with aluminum or parchment paper, and then spay the sides and bottom of the pan with cooking oil. {Lining the baking dish with foil/parchment paper will allow you to remove the squares from the pan more easily. Just pull up on the paper to remove from the pan.}

3. In a bowl, mix the graham cracker crumbs and melted butter. Press the graham cracker crumbs into the bottom of the pan and bake for 10 minutes.

4. While the crust is baking, wash and pit the cherries. {canned cherries can also be substituted for fresh}

5. Place the cherries, water, granulated sugar, lemon juice, and corn starch in a medium saucepan. Bring to a boil, then reduce heat and simmer for 10 minutes.

6. In a large bowl, beat the cream cheese, confectioners sugar, flour, vanilla, and eggs, with a hand mixer on medium speed until smooth {5 minutes}.

7. Spread the cream cheese mixture on top of the crust and then top with the cherries. Bake for 40 minutes at 350 F.

8. Remove the squares from the oven and let cool at room temperature for 30 minutes. Place in the fridge and let chill for 2 hours. Cut and serve.


Salted Caramel Brownies {revisited}

I'm a chocolate and a cheesecake girl. True story.

Lately, I've made a solid effort to be more adventurous in the dessert department.

Last week I went out for dinner and ordered a soufflé for dessert.

I'd like to add that there was also some sort of chocolate explosion thing on the menu. Totally me. In a nutshell.

I really wanted the chocolate explosion thing, but convinced myself I needed to try a souffle.

Should have went with the chocolate.

Ever since that night, I've had a chocolate baking explosion craving.

I made these brownies, and got my fix.

I had originally blogged about these super crazy brownies a couple of months ago.

I though I would bake them again and write a super improved post because:

a) people really loved these brownies.....

b) pictures are helpful......

c) and, well........ I really like you.

First, you need to make some caramel. Might I add that caramel is just as good as chocolate. They are totally playing the same game.

To make caramel you need 1) heavy whipping cream 2) corn syrup 3) sugar 4) yogurt or sour cream.

Heat up that sugar and corn syrup. First it will look like a clumpy mess {picture below}.

Let it melt. Melting sugar is super fun.

Watch it change into a clear liquid. Magic.

Boil that sugary liquid. Watch it turn brown. This is called caramelization. Basically, the sugars are toasting.

Remove it from the heat when it looks like the picture below.

Add the cream, and watch the sugar clump.

Put is back on the stove, and melt that sugar into the cream. YUM.

Add the yogurt. Heat it for a couple more minutes. Voila, caramel.

I love how the yogurt gives the caramel a rich mouth feel. Totally.

Wow, look at that chocolate. 99% chocolate. No joke.

Heat it up, add some butter.

Were makin' brownies. For reals.

Melty chocolate butter drink.

Next, whisk up some sugar, vanilla, and eggs.

Whisk it like you mean it.

Add the chocolate and some flour, and stir it up.

What a heavenly chocolaty mess.

Whoops, chocolate batter on my finger.

Whoops, in my mouth.

No I shouldn't have done that? Raw eggs?

Bake 2/3 of that brownie mixture.

Grab that sweet sweet caramel.

Spoon half onto the baked brownies and save the rest for dinner.

Top it off with the rest of that brownie mixture and bake it up.

Finally, top with salt.

Sea salt or kosher. Whichever you prefer.

Essentially, what you are now left with is a salted caramel chocolate in brownie form.

Also, 6 times bigger than a salted caramel chocolate.

Invite over some friends. They will love you. They will also save you from eating the whole tray.

It's a must.

[Print Recipe]

SALTED CARAMEL BROWNIE RECIPE

(makes 12 brownies)

{adapted from 

She's Becoming Doughmesstic

}

Caramel Ingredients

1 cup white granulated sugar

2 tbsp light corn syrup

1/2 cup heavy whipping cream

1/4 cup full fat plain yogurt or sour cream

Brownie Ingredients

4 oz unsweetened chocolate {I used 99% pure chocolate}

1/2 cup butter, unsalted

1 1/2 cups white granulated sugar

2 tsp vanilla

3 eggs

1 cup all purpose flour

sea salt or kosher salt for topping

Directions

1. In a medium saucepan, heat 1 cup of sugar and 2 tbsp of light corn syrup on medium heat for 5 minutes. At this point the sugar should start to melt. Begin to stir the sugar continuously to prevent it from burning. Continue to cook the sugar for 5 more minutes, or until it starts to boil.

2. Once the sugar has started boiling, it should be light brown in color. Continue stirring until it has reached 350 F, or medium brown in color. Do not let the sugar burn, you will definitely be able to smell if it has burnt. Remove the saucepan from the heat and let sit for one minute.

3. Slowly whisk the cream into the melted sugar. Put the saucepan back on the burner and bring the caramel to a boil. Remove the saucepan from the heat and whisk in the yogurt. Place the caramel back on the stove and heat for 2 -3 minutes.

4. Remove the caramel from the heat and transfer to a glass mason jar or bowl and let cool to room temperature for 20 minutes in the fridge, or 1 - 2 hours on the counter. Don't worry if your caramel is runny, it will thicken once cooled. Once the caramel has cooled, preheat the oven to 325 F.

5. In a small sauce pan, melt the butter and chocolate and then set to the side. In a large bowl whisk the sugar, vanilla, and eggs. Add in the warm chocolate to the egg mixture and stir. Next, add the flour and mix until all the ingredients are combined.

6. Line a 9 x 9 inch baking pan with parchment paper and then spray with cooking oil. Pour 2/3 of the batter into the baking pan, and bake for 20 minutes. Remove from the oven and let cool for 10 minutes. 

7. Spread half of the caramel sauce over the brownie layer and save the rest for a rainy day. Gently top the caramel with the the remaining brownie batter. 

8. Bake the brownies for 15 minutes, remove from the oven, sprinkle sea or kosher salt on the top, and continue baking for 5 more minutes. The brownies should be soft in texture. Do not over bake. 

9. Remove from the oven and let cool overnight. Pull the parchment paper out of the pan, and cut the brownies into squares. 

Caramelized Apricots with Goat Cheese and Pistachios


Here's a thought.

Warm, juicy, sweet apricots.

Soft, creamy, rich cheese.

Crunchy, nutty, salty pistachios.

Sweet, sticky, oozy, honey.


If you choose to make this recipe, you WILL have a flavor explosion in your mouth. Seriously.

And if you choose to make this super easy recipe, it will only take you 15 minutes. Tops. 

Did I also mention it's super classy. That's right, class x 10.

No, not the type of class that requires long stem glasses, caviar, and grey poupon.

The type of class you get when you are surrounded by amazingly wonderful people, wearing a cute summer dress, and red lipstick, of course.

Ok. So next weekend you're going to a barbecue. 

You've been asked to bring the dessert. Or an appetizer. Or you've been asked to bring nothing, but you're totally going too.

First, you need to get some fresh apricots. Not too ripe, not too under-ripe. Make sure they smell like apricots. Sweet and juicy. Don't get over ripe apricots or they will fall apart when you broil them. True story.

Next, you need to cut them in half and place them on baking sheet.

Don't forget to turn on that oven. This is necessary.


Sprinkle the tops with brown sugar. White sugar is perfectly acceptable.

Place them in the oven and watch the magic happen.

The sugar will cook and caramelize on top, leaving a sticky sweet layer.

The sides of the apricot will hold their shape. They will look like tiny bowls ready to be filled with goodness.


Next, shell some pistachios.

This is the most challenging part. Resisting the temptation to eat all the pistachios before the apricots have broiled.


Now you have to chop them nuts. Go crazy. Get mad. Chop em like you mean it.


Mix the cheeses with a fork or a whisk. Get it fluffy. Plop in on top.

Sprinkle some nuts on top and finish it off with a drizzle of honey. Done.

So good. So sweet. So classy. So perfect.


Caramelized Apricots with Goat Cheese and Pistachio Recipe (makes 10 halves)

Ingredients
5 apricots, halved {not too ripe, firm to touch}
5 tsp brown sugar
5 tbsp cream cheese, room temperature
3 tbsp soft goat cheese, room temperature
2 tbsp pistachios, chopped
1 tbsp honey

Directions 

1. Turn the oven to broil {500 F}. Move the oven rack to the top shelf.

2. Wash, then cut the apricots in half and place them on a baking sheet.

3. Sprinkle the tops with 1/2 tsp of brown sugar. and broil for 10 - 15 minutes. The brown sugar should caramelize and turn light brown.

4. In a small bowl, mix the cream cheese and goat cheese, with a fork or whisk.

5. When the apricots have cooked, remove them from the oven. Place a dollop of the cheese mixture on top of each apricot, followed by a tsp of chopped pistachios, and then drizzle with honey. Serve warm.

Soft Beer Pretzels with Warm Honey Mustard Dipping Sauce


I'm entering a contest.

It's a beer baking/making/cooking contest.

Here's the deal. Make a recipe {it must contain beer}. simple.

I'm feeling lucky. I won a free drink at bingo on Monday. totally.

Maybe I'll win a beer baking/making/baking contest. Who knows.

If you like me, like my recipe, want me to win, or you're just feeling extra nice, you can vote for my recipe here. no pressure.


I'm sure you want to know a little about these pretzels before committing. yessum.

These pretzels were a total experiment.

I've never made pretzels before. I've eaten many pretzels {who hasn't}, just never made them.

I did some research. I wrote some notes. I tweaked and simplified. I came up with a recipe.

It was good. It was tasty. As a general rule of thumb, flour, dough, yeast, and bread like things, are amazingly tasty warm.

On a scale of 1 to 10, those pretzels were a 7.

A 7 is o.k, but no good for a contest. I wanted a 10. I needed a 10 for my beer making/baking.cooking contest.

Last night {super late}, I recklessly decided to tweak the recipe.

Instead of using whole wheat flour, I decided to go for all white. I also added more beer. duh.

Pow. Smash. Crash. Pop. Pretzels. Awesome. Delicious. 10 out of 10. Warm, soft, salty pretzels with warm homemade honey mustard. say what? That's right, warm honey mustard to dip. I never thought honey mustard would be so easy to make. Turns out it is.

I also made you a diagram. Because, well, diagrams are cool.

Step one. form a dough ball.


Step 2. Roll out that ball into a snake.


Step 3. bend that snake into a horseshoe. Good luck. We win.


Step 4. twist it up.


Step 5. Finish it up.


[Print Recipe]

SOFT BEER PRETZELS WITH WARM HONEY MUSTARD DIPPING SAUCE RECIPE
makes 8 pretzels

PRETZEL INGREDIENTS
1 tbsp dry active yeast
1/4 tsp white granulated sugar
1/4 cup warm water
1 cup of beer, room temperature
3 cups of all purpose flour
1/2 tsp salt
2 cups hot water
1 tsp baking soda
1 egg, beaten
coarse sea salt for topping

HONEY MUSTARD INGREDIENTS
1/3 cup Dijon mustard
2 tbsp honey
1 tsp Apple Cider vinegar

Remove the beer from the fridge and let sit until it gets to room temperature.

In a small bowl, add one tbsp of yeast, 1/4 tsp of sugar, and 1/4 cup of warm water. Stir the mixture and then let sit for 5 - 10 minutes, or until the yeast starts to foam. This is called {proofing} the yeast. You are trying to see if the yeast is still active.

In a large bowl, add the beer. I used Blue Moon a Belgium-style wheat beer, but you can probably use anything that tastes good. Once the yeast has proofed, add it to the beer and stir. The beer and yeast mixture should initially fizz for a couple of seconds. This is normal.

Next, add the flour and salt to the beer mixture and combine. If your dough is too sticky, then add more flour. If it's too dry add more water. You want to be able to knead the dough without it falling apart or sticking too much to your hands.

Place the dough on a floured work surface and knead for 10 minutes.

Place the dough into a oiled bowl, and then lightly oil the dough itself. Cover with a damp cloth and let rise for one hour - make sure your bowl is large enough to allow room for the dough to double in size.

After the dough has doubled in size preheat the oven to 425ºF.

While the oven is preheating, tear the dough into 8 evenly sized balls. Roll each ball into a long thin narrow strip and shape into desired pretzel form - see step by step instructions above. The pretzels will rise a lot while baking, so roll the dough thin. Next, place the pretzels on a baking sheet.

In a large bowl, combine 2 cups of hot water and 1 tsp baking soda. Dip each pretzel into the water for 5 - 10 seconds, and then place it back on the baking tray. This process will make the pretzels crunchier and more caramel. Let them sit on the tray for 10 minutes.

Finally, brush the pretzels with one beaten egg and sprinkle with coarse sea salt. The amount of salt is dependent on your taste.

Bake the pretzels for 15 minutes.

While the pretzels are baking, mix the mustard, honey, and vinegar in a small sauce pan on low to medium heat. Once warm the sauce is warm, remove from heat and serve as a dipping sauce for warm pretzels.

Lavender Blueberry Apricot Squares

Whoa. That's right. I put lavender in your apricot blueberry squares.

I meant to. It wasn't a mistake. Trust me, they taste incredible.

No, not like soap.

Like sweet, flowery, crumbly, goodness.


Seriously, I was planning to make you soap.

I was also planning to make you one of those lavender dryer bags.

But then I got distracted. This is what I do. I get distracted.

I got distracted looking at cook books. I wasn't looking for lavender recipes. I had a clear goal in mind. Flowery soap and smelly laundry bags.

But then I found the most delicious looking recipe. An apricot rosemary bar.

You know what happened next. That's right, a sea of flour, butter, sugar, and other good stuff. It was magical.

Since we've got time, I'll tell you exactly how it went.

First, I cut up some butter and put it in a large bowl with some sugar.

I mixed it up until it was as fluffy as the clouds.


Then things got crazy.

I added lavender instead of rosemary. That's right. I did it.

I also added some vanilla.

And flour. And mixed it all up.

Then I squished it into a pan. Flattened the whole thing out with my hands.

Next, I simmered up some apricots and blueberries and sugar and booze. All in a saucepan.

A glass of wine in the pan, a glass of wine for me. A shot of Grand Marnier in the pan, a shot of Grand Marnier for me.

That's right. It's all class around here.

simmer simmer simmer. until all the booze is gone.

Finally, I crumbled up some butter, flour, sugar, and almonds. And threw it on top.

I baked it up.

I let it cool.

So, instead of flowery soap and smelly laundry bags, I made you squares. Boozy squares with Grand Marnier and white wine.

I thought you'd like these better. Clearly you did, because they're all gone.


Lavender Blueberry Apricot Square Recipe (print)
makes 12 squares
adapted from Baked Explorations by Matt Lewis and Renato Poliafito

Lavender Dough Ingredients
12 tbsp unsalted butter, room temperature
1/2 cup powdered sugar
1 tsp vanilla extract
1 tsp finely chopped lavender
1 3/4 cup all-purpose flour

Blueberry Apricot Filling Ingredients
2 cups fresh apricots, chopped
1 cup fresh blueberries
1 cup of white wine
1/2 cup of water
1/2 cup of granulated sugar
3 tbsp honey
2 tbsp Grand Marnier

Crumble Topping
1/2 cup all-purpose flour
1/2 cup brown sugar
1/4 cup chopped almonds
3 tbsp unsalted butter, chilled, cubed

Directions

1. Line a 9 inch square baking pan with tin foil or parchment paper {make sure to leave an overhang - you will need this to pull the bars out of the pan}. Lightly coat the parchment paper or tin foil with butter or cooking spray and set aside.

2. In a large bowl, beat the butter and powdered sugar until light and fluffy {3 - 4 minutes}, with a hand mixer.

3. Add the vanilla and chopped lavender. Mix until combined.

4. Slowly add the flour and mix, on low speed, until everything is combined.

5. Dip your hands into flour and then remove the dough from the bowl. Place the dough into the pan and press flat. Chill in the fridge for 30 minutes.

6. While the dough is chilling, prepare the blueberry apricot filling.

7. In a medium saucepan add the chopped apricots, blueberries, wine, water, sugar, honey, and Grand Marnier. Simmer on low to medium heat until the liquid has absorbed {45 - 60 minutes}. Set to the side.

8. Once the dough has chilled for half and hour, preheat the oven to 350ºF. Placet the crust into the oven and bake for 30 minutes. Remove from the oven and let cool to room temperature. Keep the oven heated at 350ºF.

9. In a bowl, mix the flour, brown sugar, chopped almonds, and butter. You are looking for a crumble consistency. You want the mixture to lightly clump together.

10. Once the lavender shortbread has cooled, spread the blueberry apricot filling, and top with the crumble. Bake for 25 minutes or until the top has lightly browned.

11. Let the bars completely cool on a wire rack, in the pan, before serving. Once they have cooled, pull the out with the parchment paper and slice into bars.

Pound Cake with Balsamic Strawberries and Chantilly Cream

It's my {me + husband} two-year anniversary tomorrow.

In light of this super special occasion, I planned. It was a top-secret surprise anniversary weekend.

Friday night was special, classy, swanky, and awesome.

I put on my best red lipstick, my little black dress, my blue suede heels, and pinned up my hair.

The first {of many} surprises, was dinner at Canlis. total class. Canlis has a guy who pours wine. That's all he does. There's also a guy who takes your coat. That's it. Just takes your coat. Everywhere you turn, waiters, servers, hostess's, wine guys, coat guys. totally weird.

I ate, and drank, a lot. Like you should, when you're wearing red lipstick and your cutest black dress.

One glass of wine turned into two, turned into three, turned into a bottle, turned into me, asleep on my desk wearing my cutest black dress with the keys of my computer stuck into my face. hot. I know.


Day 2 - we drove/took a ferry, to the San Juan Islands. The San Juan Islands are dreamy. for sure.

We ate lavender strawberry rhubarb pie. lavender ice cream. Drank lavender coffee. and we I picked some lavender, hoping to bake it into something good.

Later that day we checked into the Lakedale Resort. We slept in a canvas cabin. It was magical. Imagine this; a large canvas tent, with a queen size bed, a couch, a table, 4 chairs, a view of the lake, a toasty fire. totally cool, I know.

This weekend was all about class. and swank. It's important to do it up right.

Today I woke up to a full buffet right outside my canvas tent. With fresh fruit, and coffee, and a pancake machine. Where can I get one of those? for real.

After a morning of eating, and classing. We took a drive. The sights were beautiful. I wanted to stop and take a picture. I looked out at the ocean. I thought {weird, why's that scuba diver poking his head out of the water}. No wait. A whale. What, 6 whales. and a baby. oh my!

Seven orca whales, 10 feet from the shore. It was so beautiful I cried. Lame. I know. True story.

On our way home, I saw a huge sign that said {Fresh Berries}. You must always stop if there's a sign that says fresh berries. It's the rule. I bought strawberries, and blueberries, and raspberries.

I ate the raspberries. I ate the blueberries. I boiled the strawberries with sugar and balsamic vinegar, just for you.


I also made a pound cake. It just seemed right.

A pound cake is made with one pound flour, one pound eggs, one pound sugar, and one pound butter. no joke.

I took some sugar and butter and beat it until it was light, fluffy, and white. Exactly like the picture above.

I then added eggs. and flour. and vanilla.

I mixed it all up. It was easy. 10 minutes. tops.

If your feeling extra fancy, you can do it up right. Make some whipped cream. Add some vanilla and sugar, and we can call it Chantilly. Fancy, right?


The strawberries are sweet and amazing. The balsamic vinegar is not too overpowering. It's like it was just meant to be.

The cake is light, and moist, and delicious. Eggs, and flour, and butter, and sugar. totally.

Tie it all together with some Chantilly cream, and you've got something good. A classic. 

[Print Recipe]

Pound Cake with Balsamic Strawberries and Chantilly Cream Recipe

Cake Ingredients
2 sticks of unsalted butter, softened
1 cup of granulated sugar
1 tbsp vanilla
4 eggs, slightly beaten
1 1/2 cups of flour, sifted

Strawberry Ingredients
2 cups of strawberries, chopped
2 tbsp granulated sugar
1 1/2 tbsp balsamic vinegar

Chantilly Cream Ingredients
1 cup of heavy cream
2 tbsp powdered sugar
1 tsp vanilla

Directions

1. Preheat the oven to 325 F.

2. Butter/grease/oil/spray a 5 x 9 inch loaf pan.

3. In a large bowl, with a hand mixer, beat the butter and sugar on medium speed, until white and fluffy {roughly 8 minutes}.

4. Turn the mixer to low, and mix in the vanilla.

5. In a separate bowl, whisk the eggs slightly.

6. Mix the eggs into the butter mixture, slowly {1/4 at a time}. Beat on medium speed {5 minutes}.

7. Turn the blender to low and beat in the flour {1/4 at a time}. Do not over mix.

8. Scoop the mixture into a loaf pan and bake for 60 minutes.

9. While the cake is baking, combine washed, hulled, and chopped strawberries, sugar, and balsamic vinegar in a medium saucepan. Cook on medium heat for 10 minutes. Remove and let cool.

10. Just before the cake is done, beat the cream, sugar, and vanilla in a large bowl on medium speed, until cream becomes stiff. Should take 3- 5 minutes. Your cream should hold its shape on a spoon.

11. Once the cake is done, let cool for 30 minutes {in the pan}.

12. Serve with strawberries and a dollop of Chantilly cream.

Kale and Orzo Salad with Dried Cranberries and Feta


I've spent the last week in Tofino, BC. 

I'm now back in Seattle. It's rainy. What a surprise.

Two months ago, I signed up with a local food box program. My fridge is now {at all times} full of vegetables. 

and beer. 

and amongst a bunch of other things I wont mention, there's Kale.

I was curious how kale got into my fridge. My husband was like "ya, I ordered it. kale is awesome".

weird, right?


I've been thinking about kale for a couple of days now.

I'm pretty sure I have subconsciously classified it into the same category as eggplant. The {wow you look pretty. and now you're rotting in my fridge 2 weeks later} category.

Like seriously. What the heck do you do with this kale?

Can I cover it with chocolate and bake it?

I could make kale chips? Seems like that's what people are doing.

But wait. Why would I do that, when I've got a bag of salt and vinegar chips in the cupboard?


I could try to eat it raw.

Ew, no. bitter. tough. yuck.

I could fry it in lots olive oil. with salt and pepper.

Ya, that sounds good.

I could boil some funny rice-shaped pasta. Why? Because I can.

I could toss it all together with some almonds. Heck yes.


I could throw in some sweet, sour, chewy bits of awesome. Yes, I think I will.


hmmm, cheese. don't mind if I do.

not without salt and pepper and lemon juice. of course.

Wow, that was easy.

Kale is thick and chewy. Deliciously flavorful. Slightly bitter. and does a good job at absorbing the flavors of other food.

Wait. It's also extremely healthy. Bonus.

Chewy, crunchy, sweet, salty, bitter, colorful, healthy, salad. POW.

[Print Recipe]

KALE & ORZO SALAD WITH DRIED CRANBERRIES AND FETA RECIPE (yields 4 servings as a main)

Ingredients
1 cup of dry orzo pasta
2 tbsp olive oil
1 bunch of kale, chopped
1 tbsp lemon juice
½ cup dried cranberries
½ cup feta cheese
½ cup almonds
salt and pepper to taste

Directions

1. In a medium saucepan, bring 3 cups of water to a boil. Add the dry orzo pasta and boil for 10 minutes or until soft. Drain, rinse with cold water and set to the side.

2. Wash and dry the kale. Cut off the stems. Chop into small pieces. Saute with the olive oil, on medium to low heat, until soft. Approximately 10 minutes.

3. In a large bowl combine the orzo, kale, lemon juice, dried cranberries, feta, almonds, and salt and pepper.